Build a Social Auth App with Expo React Native
This tutorial demonstrates how to build a React Native app with Expo that implements social authentication. The app showcases a complete authentication flow with protected navigation using:
- Supabase Database - a Postgres database for storing your user data with Row Level Security to ensure data is protected and users can only access their own information.
- Supabase Auth - enables users to log in through social authentication providers (Apple and Google).
If you get stuck while working through this guide, refer to the full example on GitHub.
Project setup#
Before you start building you need to set up the Database and API. You can do this by starting a new Project in Supabase and then creating a "schema" inside the database.
Create a project#
- Create a new project in the Supabase Dashboard.
- Enter your project details.
- Wait for the new database to launch.
Set up the database schema#
Now set up the database schema. You can use the "User Management Starter" quickstart in the SQL Editor, or you can copy/paste the SQL from below and run it.
- Go to the SQL Editor page in the Dashboard.
- Click User Management Starter under the Community > Quickstarts tab.
- Click Run.
You can pull the database schema down to your local project by running the db pull command. Read the local development docs for detailed instructions.
1supabase link --project-ref <project-id>2# You can get <project-id> from your project's dashboard URL: https://supabase.com/dashboard/project/<project-id>3supabase db pullGet API details#
To interact with data in database tables, you use the client libraries that wrap the auto-generated Data API endpoints, authenticating using the Project URL and key from the project Connect dialog.
Project URL
Publishable key
Read the API keys docs for a full explanation of all key types, their uses, and where to find them.
Building the app#
Start by building the React Native app from scratch.
Initialize a React Native app#
Use Expo to initialize an app called expo-social-auth with the standard template:
1npx create-expo-app@latest23cd expo-social-authInstall the additional dependencies:
- supabase-js
- @react-native-async-storage/async-storage - A key-value store for React Native.
- expo-secure-store - Provides a way to securely store key-value pairs locally on the device.
- expo-splash-screen - Provides a way to programmatically manage the splash screen.
1npx expo install @supabase/supabase-js @react-native-async-storage/async-storage expo-secure-store expo-splash-screenNow, create a helper file to initialize the Supabase client for both web and React Native platforms using platform-specific storage adapters: Expo SecureStore for mobile and AsyncStorage for web.
lib/supabase.web.ts
1import AsyncStorage from '@react-native-async-storage/async-storage'2import { createClient } from '@supabase/supabase-js'3import 'react-native-url-polyfill/auto'45const isSSR = typeof window === 'undefined'67const ExpoWebSecureStoreAdapter = {8 getItem: (key: string) => {9 if (isSSR) return null10 console.debug('getItem', { key })11 return AsyncStorage.getItem(key)12 },13 setItem: (key: string, value: string) => {14 if (isSSR) return15 return AsyncStorage.setItem(key, value)16 },17 removeItem: (key: string) => {18 if (isSSR) return19 return AsyncStorage.removeItem(key)20 },21}2223export const supabase = createClient(24 process.env.EXPO_PUBLIC_SUPABASE_URL ?? '',25 process.env.EXPO_PUBLIC_SUPABASE_PUBLISHABLE_KEY ?? '',26 {27 auth: {28 storage: ExpoWebSecureStoreAdapter,29 autoRefreshToken: true,30 persistSession: true,31 detectSessionInUrl: false,32 },33 }34)Set up environment variables#
You need the API URL and the publishable key copied earlier.
These variables are safe to expose in your Expo app since Supabase has Row Level Security enabled on your database.
Create a .env file containing these variables:
.env
1EXPO_PUBLIC_SUPABASE_URL=""2EXPO_PUBLIC_SUPABASE_PUBLISHABLE_KEY=""3EXPO_PUBLIC_APPLE_AUTH_SERVICE_ID=""4EXPO_PUBLIC_APPLE_AUTH_REDIRECT_URI=""5EXPO_PUBLIC_GOOGLE_AUTH_WEB_CLIENT_ID=""Set up protected navigation#
Next, you need to protect app navigation to prevent unauthenticated users from accessing protected routes. Use the Expo SplashScreen to display a loading screen while fetching the user profile and verifying authentication status.
Create the AuthContext#
Create a React context to manage the authentication session, making it accessible from any component:
hooks/use-auth-context.tsx
1import { createContext, useContext } from 'react'23export type AuthData = {4 claims?: Record<string, any> | null5 profile?: any | null6 isLoading: boolean7 isLoggedIn: boolean8}910export const AuthContext = createContext<AuthData>({11 claims: undefined,12 profile: undefined,13 isLoading: true,14 isLoggedIn: false,15})1617export const useAuthContext = () => useContext(AuthContext)Create the AuthProvider#
Next, create a provider component to manage the authentication session throughout the app:
providers/auth-provider.tsx
1import { AuthContext } from '@/hooks/use-auth-context'2import { supabase } from '@/lib/supabase'3import { PropsWithChildren, useEffect, useState } from 'react'45export default function AuthProvider({ children }: PropsWithChildren) {6 const [claims, setClaims] = useState<Record<string, any> | undefined | null>()7 const [profile, setProfile] = useState<any>()8 const [isLoading, setIsLoading] = useState<boolean>(true)910 // Fetch the claims once, and subscribe to auth state changes11 useEffect(() => {12 const fetchClaims = async () => {13 setIsLoading(true)1415 const { data, error } = await supabase.auth.getClaims()1617 if (error) {18 console.error('Error fetching claims:', error)19 }2021 setClaims(data?.claims ?? null)22 setIsLoading(false)23 }2425 fetchClaims()2627 const {28 data: { subscription },29 } = supabase.auth.onAuthStateChange(async (_event, _session) => {30 console.log('Auth state changed:', { event: _event })31 const { data } = await supabase.auth.getClaims()32 setClaims(data?.claims ?? null)33 })3435 // Cleanup subscription on unmount36 return () => {37 subscription.unsubscribe()38 }39 }, [])4041 // Fetch the profile when the claims change42 useEffect(() => {43 const fetchProfile = async () => {44 setIsLoading(true)4546 if (claims) {47 const { data } = await supabase.from('profiles').select('*').eq('id', claims.sub).single()4849 setProfile(data)50 } else {51 setProfile(null)52 }5354 setIsLoading(false)55 }5657 fetchProfile()58 }, [claims])5960 return (61 <AuthContext.Provider62 value={{63 claims,64 isLoading,65 profile,66 isLoggedIn: claims != undefined,67 }}68 >69 {children}70 </AuthContext.Provider>71 )72}Create the SplashScreenController#
Create a SplashScreenController component to display the Expo SplashScreen while the authentication session is loading:
components/splash-screen-controller.tsx
1import { useAuthContext } from '@/hooks/use-auth-context'2import { SplashScreen } from 'expo-router'34SplashScreen.preventAutoHideAsync()56export function SplashScreenController() {7 const { isLoading } = useAuthContext()89 if (!isLoading) {10 SplashScreen.hideAsync()11 }1213 return null14}Create a logout component#
Create a logout button component to handle user sign-out:
components/social-auth-buttons/sign-out-button.tsx
1import { supabase } from '@/lib/supabase'2import React from 'react'3import { Button } from 'react-native'45async function onSignOutButtonPress() {6 const { error } = await supabase.auth.signOut()78 if (error) {9 console.error('Error signing out:', error)10 }11}1213export default function SignOutButton() {14 return <Button title="Sign out" onPress={onSignOutButtonPress} />15}And add it to the app/(tabs)/index.tsx file used to display the user profile data and the logout button:
app/(tabs)/index.tsx
1import { Image } from 'expo-image'2import { StyleSheet } from 'react-native'34import { HelloWave } from '@/components/hello-wave'5import ParallaxScrollView from '@/components/parallax-scroll-view'6import { ThemedText } from '@/components/themed-text'7import { ThemedView } from '@/components/themed-view'8import SignOutButton from '@/components/social-auth-buttons/sign-out-button'9import { useAuthContext } from '@/hooks/use-auth-context'1011export default function HomeScreen() {12 const { profile } = useAuthContext()1314 return (15 <ParallaxScrollView16 headerBackgroundColor={{ light: '#A1CEDC', dark: '#1D3D47' }}17 headerImage={18 <Image19 source={require('@/assets/images/partial-react-logo.png')}20 style={styles.reactLogo}21 />22 }23 >24 <ThemedView style={styles.titleContainer}>25 <ThemedText type="title">Welcome!</ThemedText>26 <HelloWave />27 </ThemedView>28 <ThemedView style={styles.stepContainer}>29 <ThemedText type="subtitle">Username</ThemedText>30 <ThemedText>{profile?.username}</ThemedText>31 <ThemedText type="subtitle">Full name</ThemedText>32 <ThemedText>{profile?.full_name}</ThemedText>33 </ThemedView>34 <SignOutButton />35 </ParallaxScrollView>36 )37}3839const styles = StyleSheet.create({40 titleContainer: {41 flexDirection: 'row',42 alignItems: 'center',43 gap: 8,44 },45 stepContainer: {46 gap: 8,47 marginBottom: 8,48 },49 reactLogo: {50 height: 178,51 width: 290,52 bottom: 0,53 left: 0,54 position: 'absolute',55 },56})Create a login screen#
Next, create a basic login screen component:
app/login.tsx
1import { Link, Stack } from 'expo-router'2import { StyleSheet } from 'react-native'34import { ThemedText } from '@/components/themed-text'5import { ThemedView } from '@/components/themed-view'67export default function LoginScreen() {8 return (9 <>10 <Stack.Screen options={{ title: 'Login' }} />11 <ThemedView style={styles.container}>12 <ThemedText type="title">Login</ThemedText>13 <Link href="/" style={styles.link}>14 <ThemedText type="link">Try to navigate to home screen!</ThemedText>15 </Link>16 </ThemedView>17 </>18 )19}2021const styles = StyleSheet.create({22 container: {23 flex: 1,24 alignItems: 'center',25 justifyContent: 'center',26 padding: 20,27 },28 link: {29 marginTop: 15,30 paddingVertical: 15,31 },32})Implement protected routes#
Wrap the navigation with the AuthProvider and SplashScreenController.
Using Expo Router's protected routes, you can secure navigation:
app/\_layout.tsx
1import { DarkTheme, DefaultTheme, ThemeProvider } from '@react-navigation/native'2import { Stack } from 'expo-router'3import { StatusBar } from 'expo-status-bar'4import 'react-native-reanimated'56import { SplashScreenController } from '@/components/splash-screen-controller'78import { useAuthContext } from '@/hooks/use-auth-context'9import { useColorScheme } from '@/hooks/use-color-scheme'10import AuthProvider from '@/providers/auth-provider'1112// Separate RootNavigator so we can access the AuthContext13function RootNavigator() {14 const { isLoggedIn } = useAuthContext()1516 return (17 <Stack>18 <Stack.Protected guard={isLoggedIn}>19 <Stack.Screen name="(tabs)" options={{ headerShown: false }} />20 </Stack.Protected>21 <Stack.Protected guard={!isLoggedIn}>22 <Stack.Screen name="login" options={{ headerShown: false }} />23 </Stack.Protected>24 <Stack.Screen name="+not-found" />25 </Stack>26 )27}2829export default function RootLayout() {30 const colorScheme = useColorScheme()3132 return (33 <ThemeProvider value={colorScheme === 'dark' ? DarkTheme : DefaultTheme}>34 <AuthProvider>35 <SplashScreenController />36 <RootNavigator />37 <StatusBar style="auto" />38 </AuthProvider>39 </ThemeProvider>40 )41}You can now test the app by running:
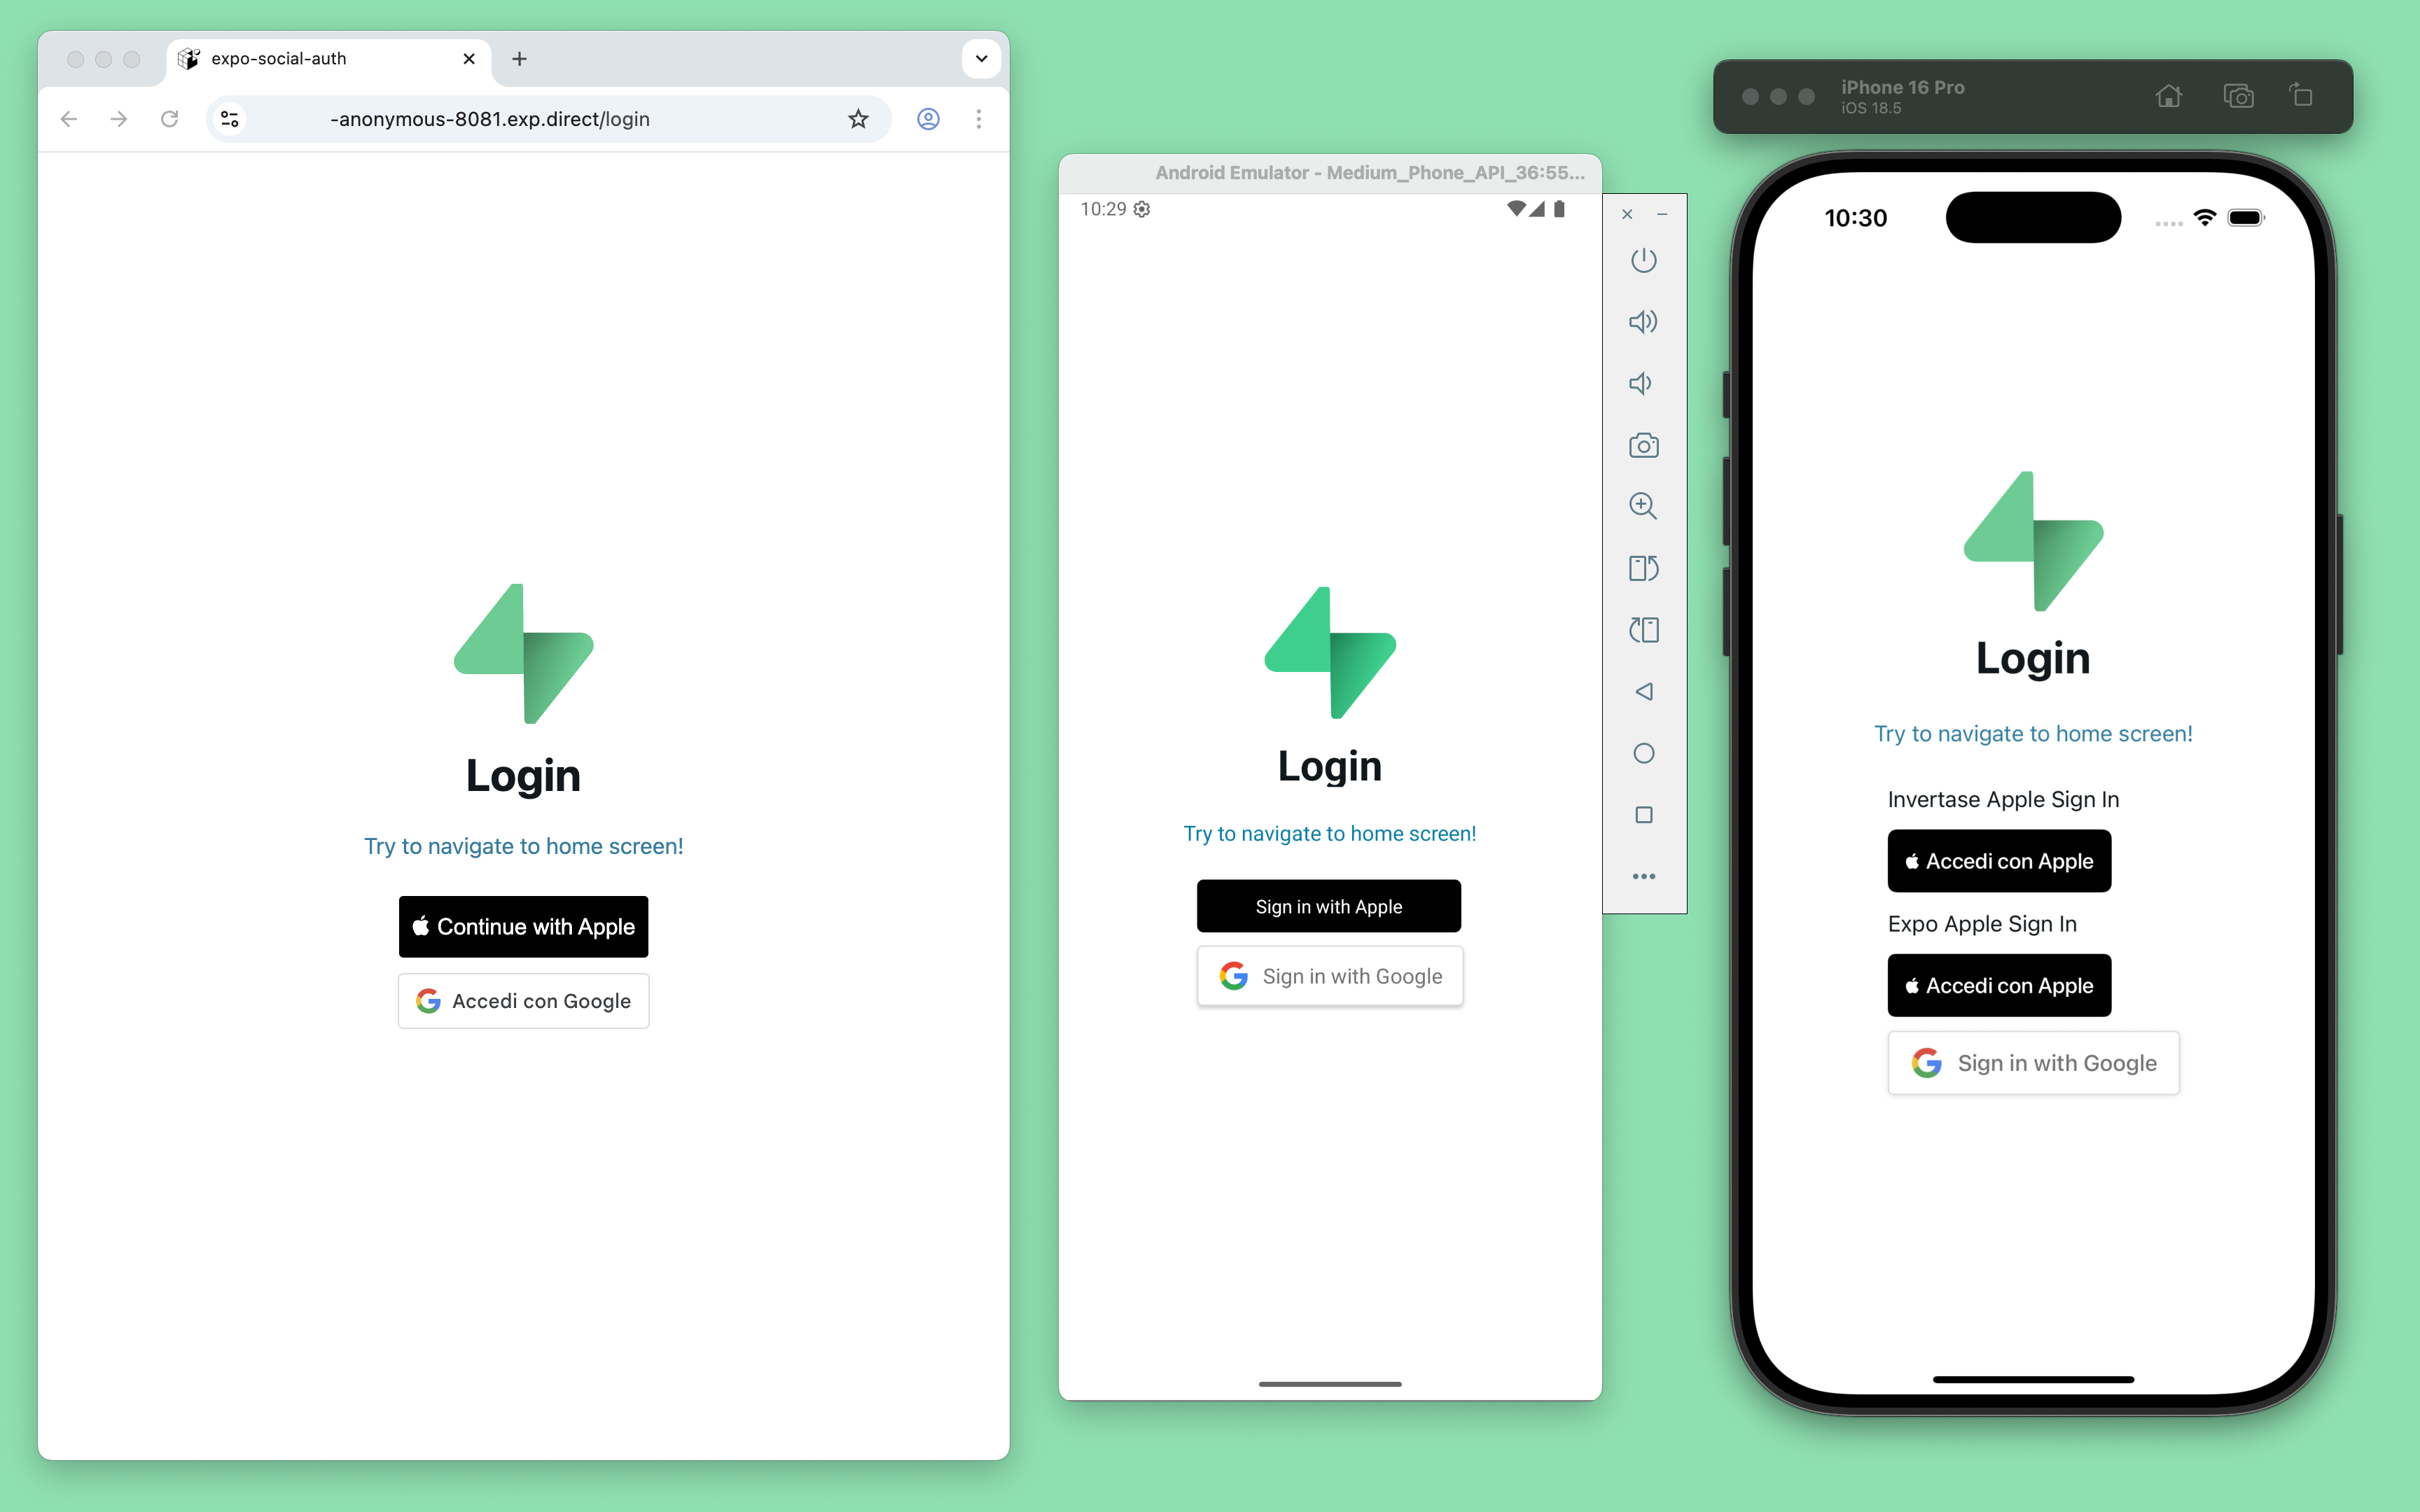
1npx expo prebuild2npx expo start --clearVerify that the app works as expected. The splash screen displays while fetching the user profile, and the login page appears even when attempting to navigate to the home screen using the Link button.
By default Supabase Auth requires email verification before a session is created for the user. To support email verification you need to implement deep link handling!
While testing, you can disable email confirmation in your project's email auth provider settings.
Integrate social authentication#
Now integrate social authentication with Supabase Auth, starting with Apple authentication. If you only need to implement Google authentication, you can skip to the Google authentication section.
Apple authentication#
Start by adding the button inside the login screen:
1…2import AppleSignInButton from '@/components/social-auth-buttons/apple/apple-sign-in-button';3…4export default function LoginScreen() {5 return (6 <>7 <Stack.Screen options={{ title: 'Login' }} />8 <ThemedView style={styles.container}>9 …10 <AppleSignInButton />11 …12 </ThemedView>13 </>14 );15}16…For Apple authentication, you can choose between:
- Invertase's React Native Apple Authentication library - that supports iOS, Android
- react-apple-signin-auth - that supports Web, also suggested by Invertase
- Expo's AppleAuthentication library - that supports iOS only
For either option, you need to obtain a Service ID from the Apple Developer Console.
To enable Apple sign-up on Android and Web, you also need to register the tunnelled URL (e.g., https://arnrer1-anonymous-8081.exp.direct) obtained by running:
1npx expo start --tunnelAnd add it to the Redirect URLs field in your Supabase dashboard Authentication configuration.
For more information, follow the Supabase Login with Apple guide.
Prerequisites#
Before proceeding, ensure you have followed the Invertase prerequisites documented in the Invertase Initial Setup Guide and the Invertase Android Setup Guide.
You need to add two new environment variables to the .env file:
1EXPO_PUBLIC_APPLE_AUTH_SERVICE_ID="YOUR_APPLE_AUTH_SERVICE_ID"2EXPO_PUBLIC_APPLE_AUTH_REDIRECT_URI="YOUR_APPLE_AUTH_REDIRECT_URI"iOS#
Install the @invertase/react-native-apple-authentication library:
1npx expo install @invertase/react-native-apple-authenticationThen create the iOS specific button component AppleSignInButton:
components/social-auth-buttons/apple/apple-sign-in-button.ios.tsx
1import { supabase } from '@/lib/supabase'2import { AppleButton, appleAuth } from '@invertase/react-native-apple-authentication'3import type { SignInWithIdTokenCredentials } from '@supabase/supabase-js'4import { router } from 'expo-router'5import { Platform } from 'react-native'67async function onAppleButtonPress() {8 // Performs login request9 const appleAuthRequestResponse = await appleAuth.performRequest({10 requestedOperation: appleAuth.Operation.LOGIN,11 // Note: it appears putting FULL_NAME first is important, see issue #29312 requestedScopes: [appleAuth.Scope.FULL_NAME, appleAuth.Scope.EMAIL],13 })1415 // Get the current authentication state for user16 // Note: This method must be tested on a real device. On the iOS simulator it always throws an error.17 const credentialState = await appleAuth.getCredentialStateForUser(appleAuthRequestResponse.user)1819 console.log('Apple sign in successful:', { credentialState, appleAuthRequestResponse })2021 if (22 credentialState === appleAuth.State.AUTHORIZED &&23 appleAuthRequestResponse.identityToken &&24 appleAuthRequestResponse.authorizationCode25 ) {26 const signInWithIdTokenCredentials: SignInWithIdTokenCredentials = {27 provider: 'apple',28 token: appleAuthRequestResponse.identityToken,29 nonce: appleAuthRequestResponse.nonce,30 access_token: appleAuthRequestResponse.authorizationCode,31 }3233 const { data, error } = await supabase.auth.signInWithIdToken(signInWithIdTokenCredentials)3435 if (error) {36 console.error('Error signing in with Apple:', error)37 }3839 if (data) {40 console.log('Apple sign in successful:', data)41 router.navigate('/(tabs)')42 }43 }44}4546export default function AppleSignInButton() {47 if (Platform.OS !== 'ios') {48 return <></>49 }5051 return (52 <AppleButton53 buttonStyle={AppleButton.Style.BLACK}54 buttonType={AppleButton.Type.SIGN_IN}55 style={{ width: 160, height: 45 }}56 onPress={() => onAppleButtonPress()}57 />58 )59}To test functionality on the simulator, remove the getCredentialStateForUser check:
Enable the Apple authentication capability in iOS:
1{2 "expo": {3 …4 "ios": {5 …6 "usesAppleSignIn": true7 …8 },9 …10 }11}Add the capabilities to the Info.plist file by following the Expo documentation.
Before testing the app, if you've already built the iOS app, clean the project artifacts:
1npx react-native-clean-project clean-project-autoIf issues persist, try completely cleaning the cache, as reported by many users in this closed issue.
Finally, update the iOS project by installing the Pod library and running the Expo prebuild command:
1cd ios2pod install3cd ..4npx expo prebuildNow test the application on a physical device:
1npx expo run:ios --no-build-cache --deviceYou should see the login screen with the Apple authentication button.
If you get stuck while working through this guide, refer to the full Invertase example on GitHub.
Android#
Install the required libraries:
1npx expo install @invertase/react-native-apple-authentication react-native-get-random-values uuidNext, create the Android-specific AppleSignInButton component:
components/social-auth-buttons/apple/apple-sign-in-button.android.tsx
1import { supabase } from '@/lib/supabase'2import { appleAuthAndroid, AppleButton } from '@invertase/react-native-apple-authentication'3import { SignInWithIdTokenCredentials } from '@supabase/supabase-js'4import { Platform } from 'react-native'5import 'react-native-get-random-values'6import { v4 as uuid } from 'uuid'78async function onAppleButtonPress() {9 // Generate secure, random values for state and nonce10 const rawNonce = uuid()11 const state = uuid()1213 // Configure the request14 appleAuthAndroid.configure({15 // The Service ID you registered with Apple16 clientId: process.env.EXPO_PUBLIC_APPLE_AUTH_SERVICE_ID ?? '',1718 // Return URL added to your Apple dev console. We intercept this redirect, but it must still match19 // the URL you provided to Apple. It can be an empty route on your backend as it's never called.20 redirectUri: process.env.EXPO_PUBLIC_APPLE_AUTH_REDIRECT_URI ?? '',2122 // The type of response requested - code, id_token, or both.23 responseType: appleAuthAndroid.ResponseType.ALL,2425 // The amount of user information requested from Apple.26 scope: appleAuthAndroid.Scope.ALL,2728 // Random nonce value that will be SHA256 hashed before sending to Apple.29 nonce: rawNonce,3031 // Unique state value used to prevent CSRF attacks. A UUID will be generated if nothing is provided.32 state,33 })3435 // Open the browser window for user sign in36 const credentialState = await appleAuthAndroid.signIn()37 console.log('Apple sign in successful:', credentialState)3839 if (credentialState.id_token && credentialState.code && credentialState.nonce) {40 const signInWithIdTokenCredentials: SignInWithIdTokenCredentials = {41 provider: 'apple',42 token: credentialState.id_token,43 nonce: credentialState.nonce,44 access_token: credentialState.code,45 }4647 const { data, error } = await supabase.auth.signInWithIdToken(signInWithIdTokenCredentials)4849 if (error) {50 console.error('Error signing in with Apple:', error)51 }5253 if (data) {54 console.log('Apple sign in successful:', data)55 }56 }57}5859export default function AppleSignInButton() {60 if (Platform.OS !== 'android' || appleAuthAndroid.isSupported !== true) {61 return <></>62 }6364 return (65 <AppleButton66 buttonStyle={AppleButton.Style.BLACK}67 buttonType={AppleButton.Type.SIGN_IN}68 onPress={() => onAppleButtonPress()}69 />70 )71}You should now be able to test the authentication by running it on a physical device or simulator:
1npx expo run:android --no-build-cacheGoogle authentication#
Start by adding the button to the login screen:
1…2import GoogleSignInButton from '@/components/social-auth-buttons/google/google-sign-in-button';3…4export default function LoginScreen() {5 return (6 <>7 <Stack.Screen options={{ title: 'Login' }} />8 <ThemedView style={styles.container}>9 …10 <GoogleSignInButton />11 …12 </ThemedView>13 </>14 );15}16…For Google authentication, you can choose between the following options:
- GN Google Sign In Premium - that supports iOS, Android, and Web by using the latest Google's One Tap sign-in (but it requires a subscription)
- @react-oauth/google - that supports Web (so it's not a good option for mobile, but it works)
- Relying on the
signInWithOAuthfunction of the Supabase Auth - that also supports iOS, Android and Web (useful also to manage any other OAuth provider)
The GN Google Sign In Free doesn't support iOS or Android, as it doesn't allow to pass a custom nonce to the sign-in request.
For either option, you need to obtain a Web Client ID from the Google Cloud Engine, as explained in the Google Sign In guide.
This guide only uses the @react-oauth/google@latest option for the Web, and the signInWithOAuth for the mobile platforms.
Before proceeding, add a new environment variable to the .env file:
1EXPO_PUBLIC_GOOGLE_AUTH_WEB_CLIENT_ID="YOUR_GOOGLE_AUTH_WEB_CLIENT_ID"Install the @react-oauth/google library:
1npx expo install @react-oauth/googleEnable the expo-web-browser plugin in app.json:
1{2 "expo": {3 …4 "plugins": [5 …6 [7 "expo-web-browser",8 {9 "experimentalLauncherActivity": false10 }11 ]12 …13 ],14 …15 }16}Then create the iOS specific button component GoogleSignInButton:
components/social-auth-buttons/google/google-sign-in-button.web.tsx
1import { supabase } from '@/lib/supabase'2import { CredentialResponse, GoogleLogin, GoogleOAuthProvider } from '@react-oauth/google'3import { SignInWithIdTokenCredentials } from '@supabase/supabase-js'4import { useEffect, useState } from 'react'56import 'react-native-get-random-values'78export default function GoogleSignInButton() {9 // Generate secure, random values for state and nonce10 const [nonce, setNonce] = useState('')11 const [sha256Nonce, setSha256Nonce] = useState('')1213 async function onGoogleButtonSuccess(authRequestResponse: CredentialResponse) {14 console.debug('Google sign in successful:', { authRequestResponse })15 if (authRequestResponse.clientId && authRequestResponse.credential) {16 const signInWithIdTokenCredentials: SignInWithIdTokenCredentials = {17 provider: 'google',18 token: authRequestResponse.credential,19 nonce: nonce,20 }2122 const { data, error } = await supabase.auth.signInWithIdToken(signInWithIdTokenCredentials)2324 if (error) {25 console.error('Error signing in with Google:', error)26 }2728 if (data) {29 console.log('Google sign in successful:', data)30 }31 }32 }3334 function onGoogleButtonFailure() {35 console.error('Error signing in with Google')36 }3738 useEffect(() => {39 function generateNonce(): string {40 const array = new Uint32Array(1)41 window.crypto.getRandomValues(array)42 return array[0].toString()43 }4445 async function generateSha256Nonce(nonce: string): Promise<string> {46 const buffer = await window.crypto.subtle.digest('sha-256', new TextEncoder().encode(nonce))47 const array = Array.from(new Uint8Array(buffer))48 return array.map((b) => b.toString(16).padStart(2, '0')).join('')49 }5051 let nonce = generateNonce()52 setNonce(nonce)5354 generateSha256Nonce(nonce).then((sha256Nonce) => {55 setSha256Nonce(sha256Nonce)56 })57 }, [])5859 return (60 <GoogleOAuthProvider61 clientId={process.env.EXPO_PUBLIC_GOOGLE_AUTH_WEB_CLIENT_ID ?? ''}62 nonce={sha256Nonce}63 >64 <GoogleLogin65 nonce={sha256Nonce}66 onSuccess={onGoogleButtonSuccess}67 onError={onGoogleButtonFailure}68 useOneTap={true}69 auto_select={true}70 />71 </GoogleOAuthProvider>72 )73}Test the authentication in your browser using the tunnelled HTTPS URL:
1npx expo start --tunnelTo allow the Google Sign In to work, as you did before for Apple, you need to register the tunnelled URL (e.g., https://arnrer1-anonymous-8081.exp.direct) obtained to the Authorized JavaScript origins list of your Google Cloud Console's OAuth 2.0 Client IDs configuration.