Replication Setup
Configure publications and destinations for replication.
Private Alpha
Replication is currently in private alpha. Access is limited and features may change.
Replication uses Postgres logical replication to stream changes from your database. Powered by Supabase ETL, an open source tool built for Postgres logical replication, it provides a managed interface through the Dashboard to configure and monitor replication pipelines.
Setup overview#
Replication requires two main components: a Postgres publication (defines what to replicate) and a destination (where data is sent). Follow these steps to set up your replication pipeline.
If you already have a Postgres publication set up, you can skip to Step 2: Enable replication.
Step 1: Create a Postgres publication#
A Postgres publication defines which tables and change types will be replicated from your database. You create publications using SQL.
Creating a publication#
The following SQL examples assume you have users and orders tables in your database.
Publication for specific tables
1-- Create publication for both tables2create publication pub_users_orders3for table users, orders;This publication will track all changes (INSERT, UPDATE, DELETE, TRUNCATE) for both the users and orders tables.
Publication for all tables in a schema
1-- Create a publication for all tables in the public schema2create publication pub_all_public for tables in schema public;This will track changes for all existing and future tables in the public schema.
Publication for all tables
1-- Create a publication for all tables2create publication pub_all_tables for all tables;This will track changes for all tables in your database.
Advanced publication options#
Selecting specific columns
You can replicate only a subset of columns from a table:
1-- Replicate only specific columns from the users table2create publication pub_users_subset3for table users (id, email, created_at);This will only replicate the id, email, and created_at columns from the users table.
Filtering rows with a predicate
You can filter which rows to replicate using a WHERE clause:
1-- Only replicate active users2create publication pub_active_users3for table users where (status = 'active');45-- Only replicate recent orders6create publication pub_recent_orders7for table orders where (created_at > '2024-01-01');Viewing publications in the Dashboard#
After creating a publication via SQL, you can view it in the Supabase Dashboard:
- Navigate to Database → Publications in your Supabase Dashboard
- You'll see all your publications listed with their tables
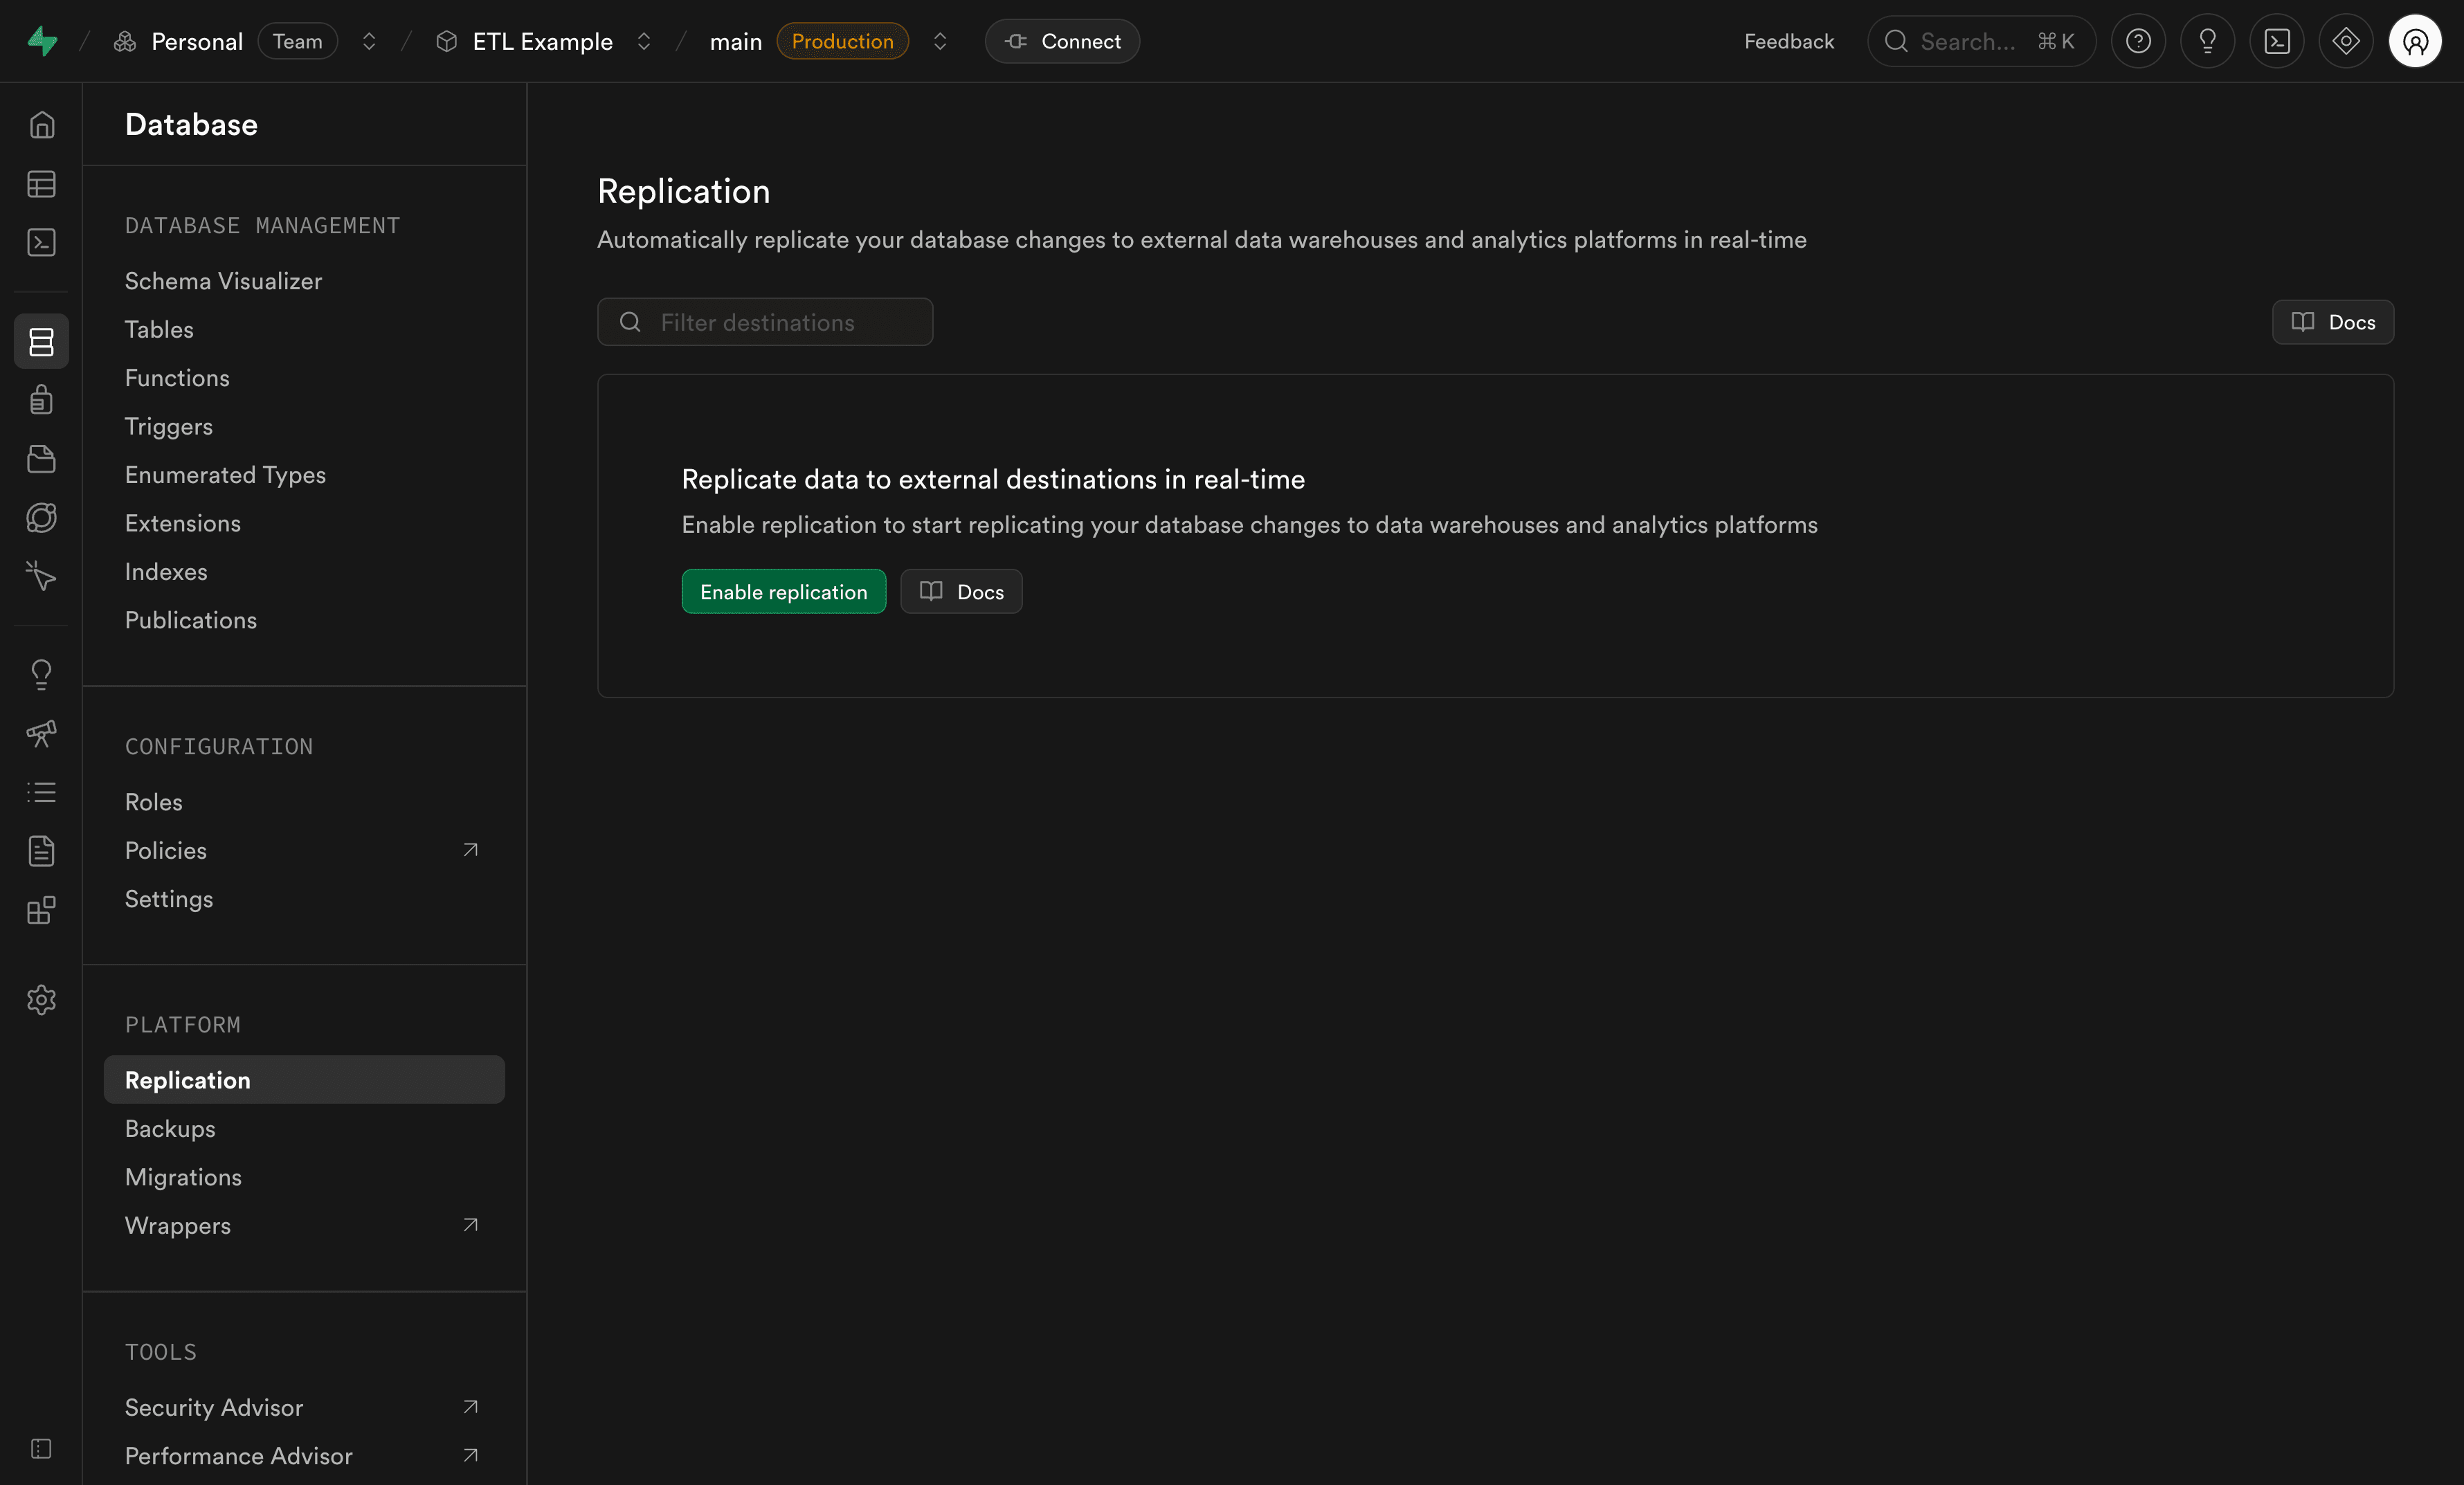
Step 2: Enable replication#
Before adding destinations, you need to enable replication for your project:
- Navigate to the Database section in your Supabase Dashboard
- Select the replication tab
- Click Enable replication to activate replication for your project
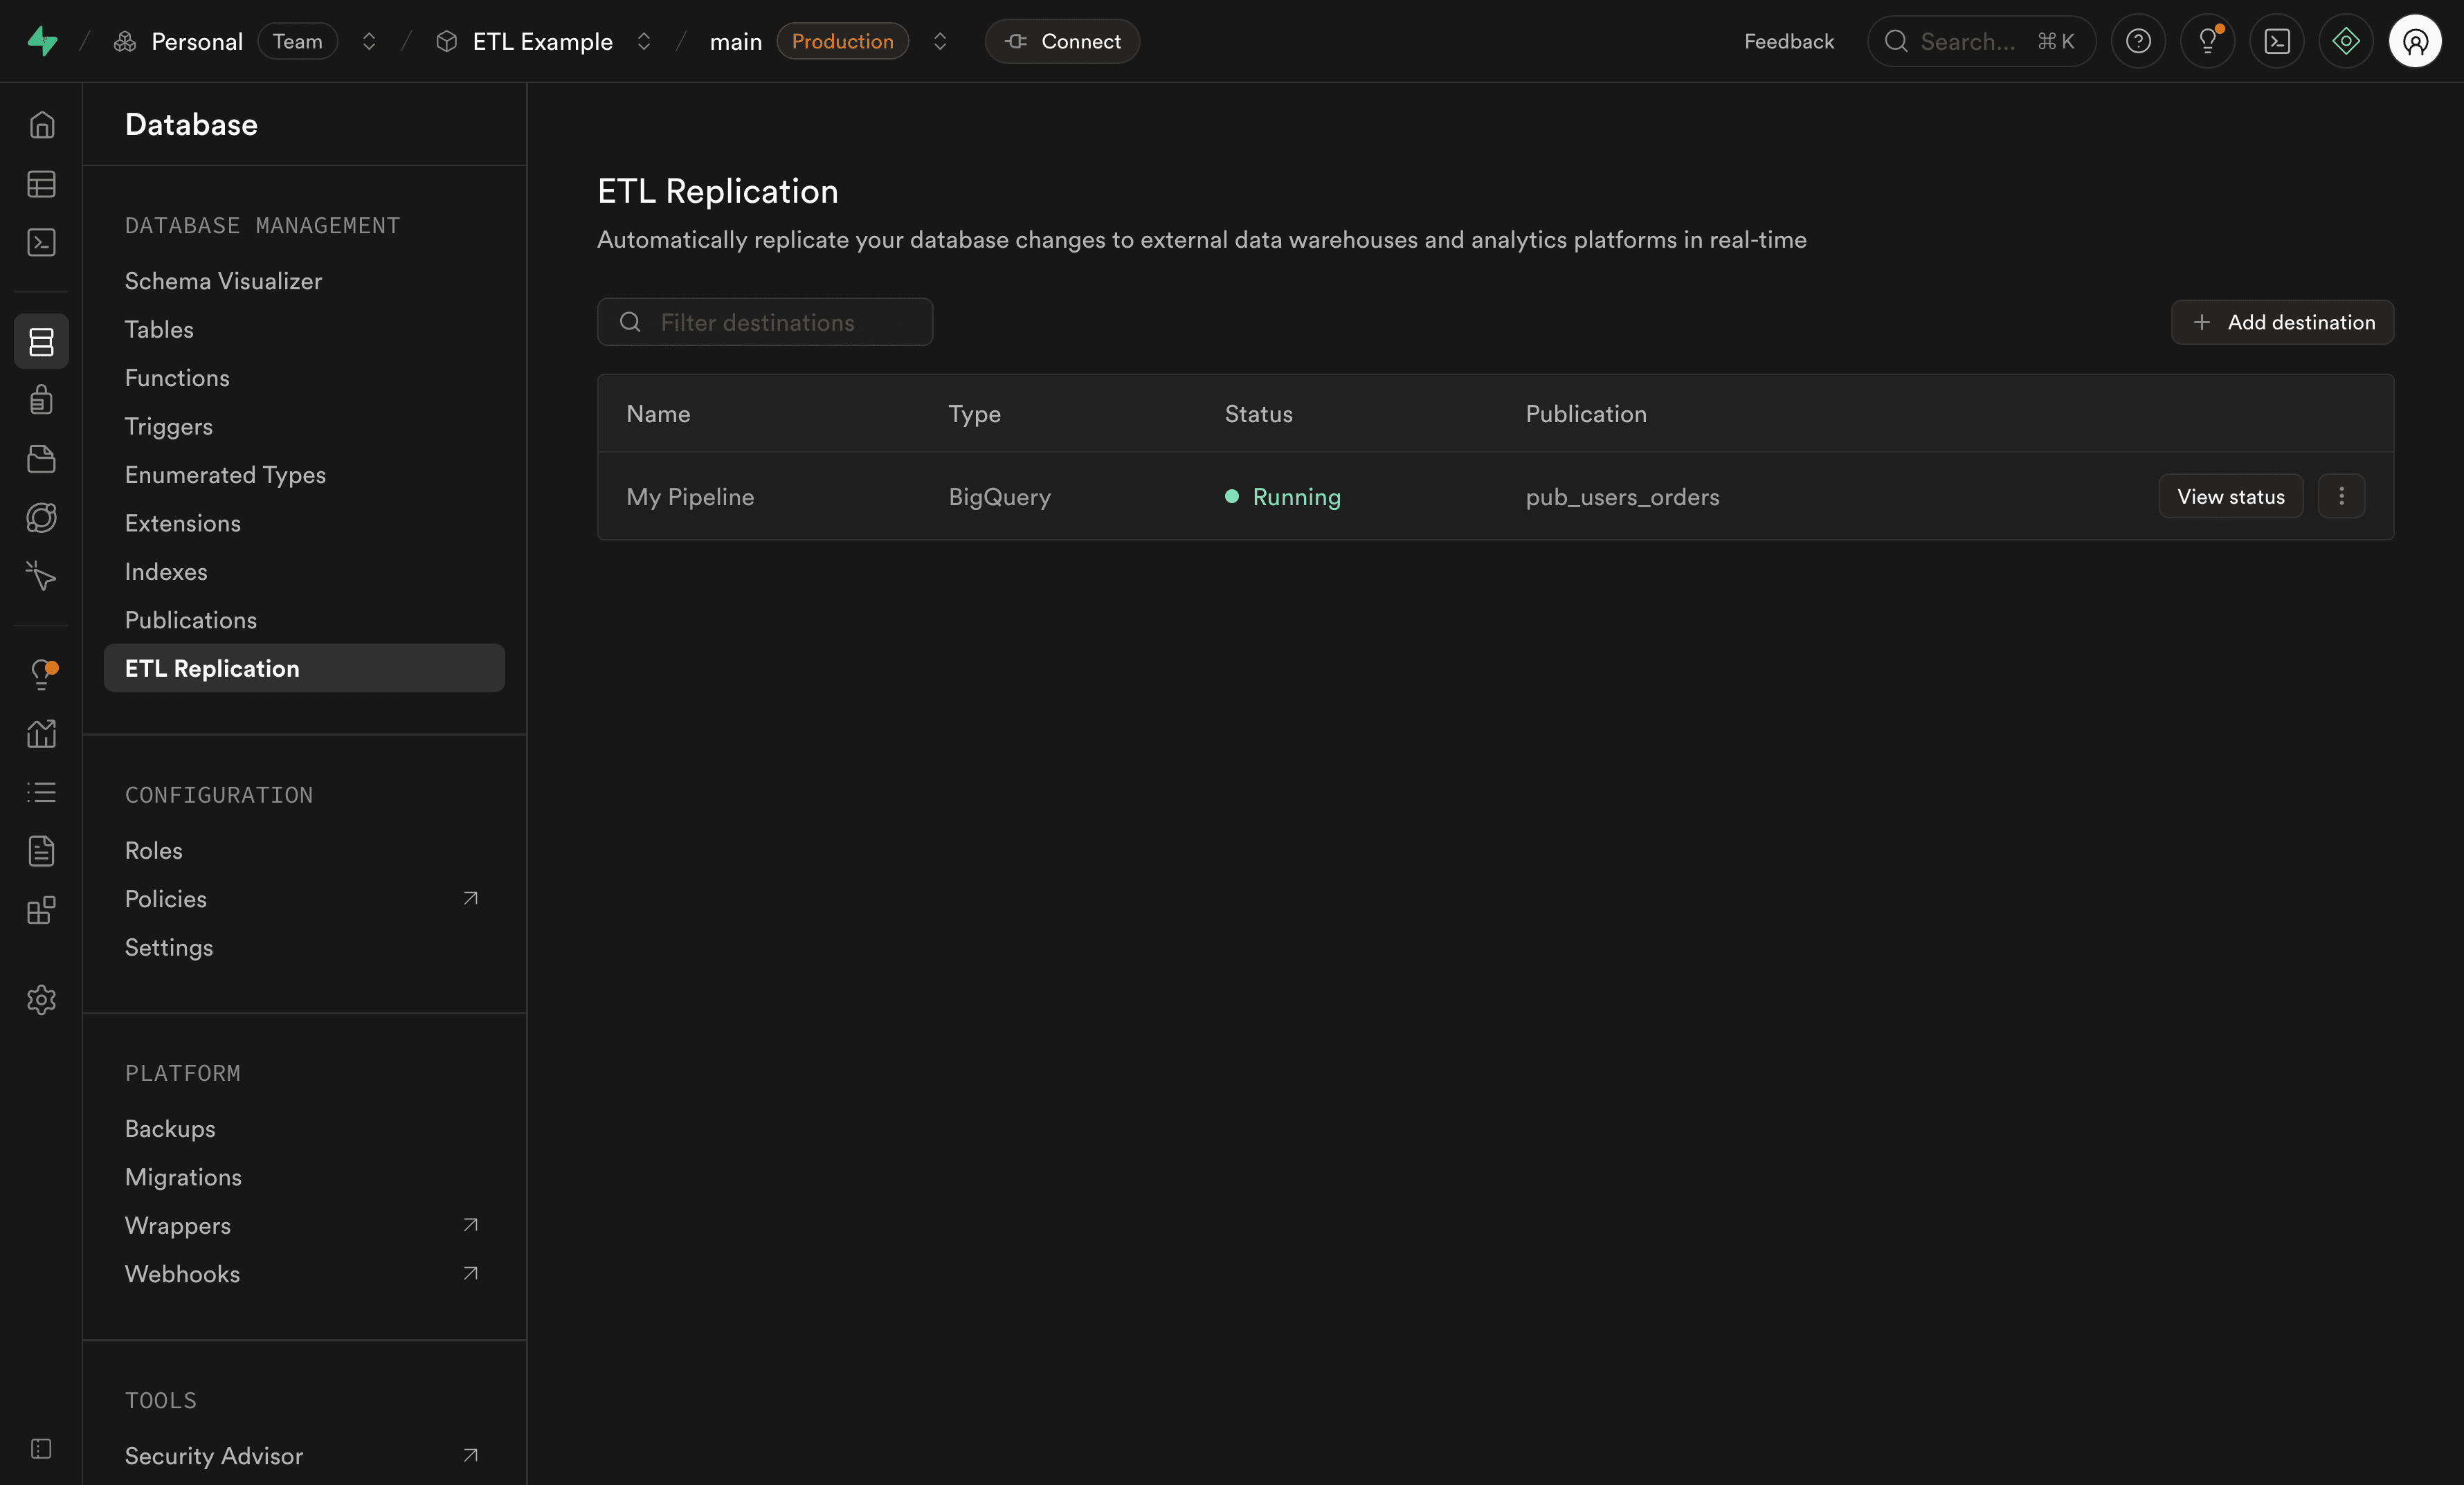
Step 3: Add a destination#
Once replication is enabled and you have a Postgres publication, you can add a destination. The destination is where your replicated data will be stored, while the pipeline is the active Postgres replication process that continuously streams changes from your database to that destination.
Choose and configure your destination#
Follow these steps to configure your destination. Right now, BigQuery is the only managed destination available in Replication.
Why Analytics Buckets are no longer listed here
We are currently working on a new Supabase Warehouse product designed to address the limitations of the previous Analytics Buckets. Our goal is to build a solution we can confidently stand behind, rather than continuing to support an approach that does not meet the quality and flexibility we want for our users.
At the moment, BigQuery is the only supported destination, but we are actively working on expanding capabilities.
BigQuery is Google's fully managed data warehouse. You can replicate your database tables to BigQuery for analytics and reporting.
Step 1: Prepare GCP resources
Before configuring BigQuery as a destination, set up the following in Google Cloud Platform:
-
Google Cloud Platform (GCP) account: Sign up for GCP if you don't have one
-
BigQuery dataset: Create a BigQuery dataset in your GCP project
- Open the BigQuery console in GCP
- Select your project
- Click "Create Dataset"
- Provide a dataset ID (e.g.,
supabase_replication)
-
GCP service account key: Create a service account with appropriate permissions:
- Go to IAM & Admin → Service Accounts
- Click "Create Service Account"
- Grant the BigQuery Data Editor role
- Create and download the JSON key file
Required permissions:
bigquery.datasets.getbigquery.tables.createbigquery.tables.getbigquery.tables.getDatabigquery.tables.updatebigquery.tables.updateData
Step 2: Configure BigQuery as a destination
-
Navigate to Database → replication in your Supabase Dashboard
-
Click Add destination

-
Configure the general settings:
- Destination name: A name to identify this destination (e.g., "BigQuery Warehouse")
- Publication: The publication to replicate data from (created in Step 1)
- Destination type: Select BigQuery
-
Configure BigQuery-specific settings:
-
Project ID: Your BigQuery project identifier (found in the GCP Console)
-
Dataset ID: The name of your BigQuery dataset (without the project ID)
In the GCP Console, the dataset is shown as
project-id.dataset-id. Enter only the part after the dot. For example, if you seemy-project.my_dataset, entermy_dataset. -
Service Account Key: Your GCP service account key in JSON format (from Step 1)
-
-
Configure Advanced Settings (optional):
- Batch wait time (milliseconds): How long to wait for more changes before sending a batch. Default is recommended for optimal performance.
-
Click Create and start to begin replication
Your replication pipeline will now start copying data from your database to BigQuery.
How it works
Once configured, replication to BigQuery:
- Captures changes from your Postgres database (INSERT, UPDATE, DELETE, TRUNCATE operations)
- Batches changes for optimal performance
- Creates BigQuery tables automatically to match your Postgres schema
- Streams data to BigQuery
How tables are structured
Due to BigQuery limitations, replicated tables use a versioned structure:
- The table you query is a view (e.g.,
users) - The actual data is stored in versioned tables with a
_versionsuffix (e.g.,users_version) - When a table is truncated in your database, a new version is created and the view automatically points to the latest version
This structure handles table truncations seamlessly while maintaining query compatibility.
Limitations
- Row size: Limited to 10 MB per row due to BigQuery Storage Write API constraints
- Table names: Source table names cannot start or end with
_when replicating to BigQuery
Additional resources
- BigQuery documentation - Official Google BigQuery documentation
Step 4: Monitor your pipeline#
After creating a destination, the replication pipeline will start and appear in the destinations list. You can monitor the pipeline's status and performance from the Dashboard.
For comprehensive monitoring instructions including pipeline states, metrics, and logs, see the Replication Monitoring guide.
Managing your pipeline#
You can manage your pipeline from the destinations list using the actions menu.
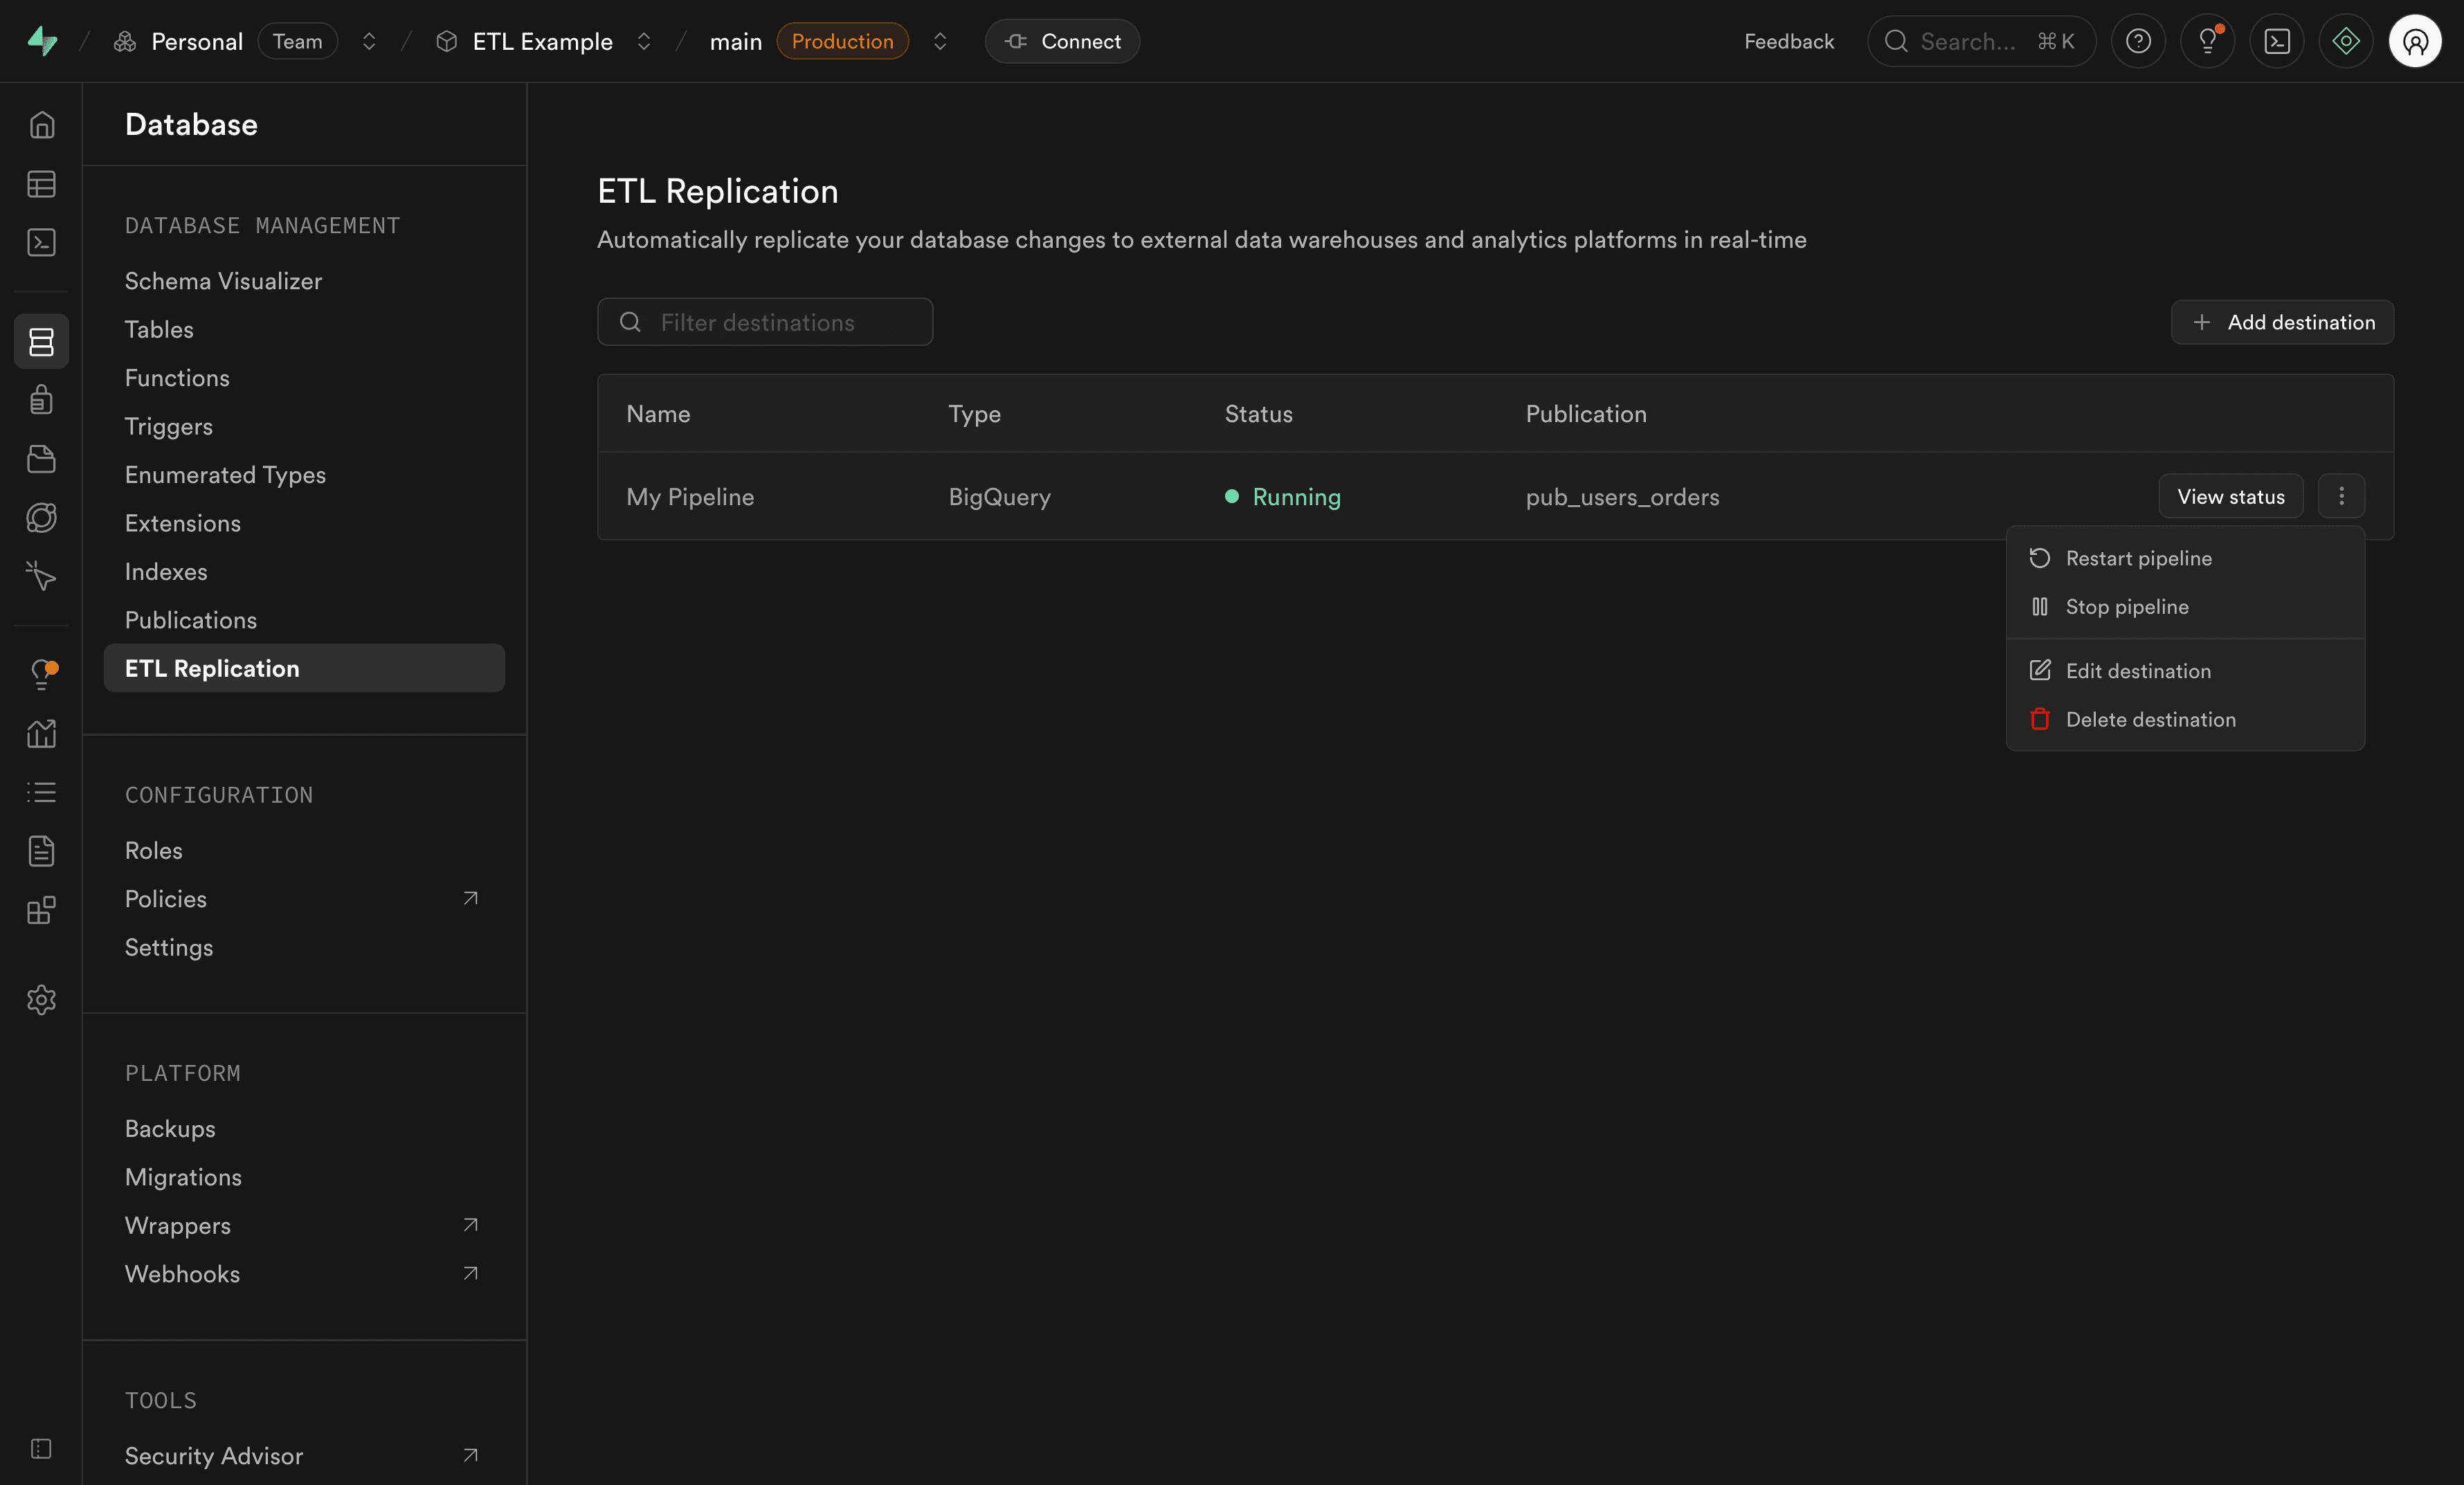
Available actions:
- Start: Begin replication for a stopped pipeline
- Stop: Pause replication (changes will queue up in the WAL)
- Restart: Stop and start the pipeline (required after publication changes)
- Edit destination: Modify destination settings like credentials or advanced options
- Delete: Remove the destination and permanently stop replication
Adding or removing tables#
If you need to modify which tables are replicated after your replication pipeline is already running, follow these steps:
If your Postgres publication uses FOR ALL TABLES or FOR TABLES IN SCHEMA, new tables in that scope are automatically included in the publication. However, you still must restart the replication pipeline for the changes to take effect.
Adding tables to replication#
-
Add the table to your publication using SQL:
1-- Add a single table to an existing publication2alter publication pub_users_orders add table products;34-- Or add multiple tables at once5alter publication pub_users_orders add table products, categories; -
Restart the replication pipeline using the actions menu (see Managing your pipeline) for the changes to take effect.
Removing tables from replication#
-
Remove the table from your Postgres publication using SQL:
1-- Remove a single table from a publication2alter publication pub_users_orders drop table orders;34-- Or remove multiple tables at once5alter publication pub_users_orders drop table orders, products; -
Restart the replication pipeline using the actions menu (see Managing your pipeline) for the changes to take effect.
Deleted tables are automatically recreated by the pipeline. To permanently delete a table, pause the pipeline first or remove it from the publication before deleting. See the FAQ for details.
How it works#
Once configured, replication:
- Captures changes from your Postgres database using Postgres publications and logical replication
- Streams the changes through the replication pipeline
- Loads the data to your destination in near real-time batches
Changes are sent in batches to optimize performance and reduce costs. The batch size and timing can be adjusted using the advanced settings. The replication pipeline currently performs data extraction and loading only, without transformation - your data is replicated as-is to the destination.
Troubleshooting#
If you encounter issues during setup:
- Publication not appearing: Ensure you created the Postgres publication via SQL and refresh the dashboard
- Tables not showing in publication: Verify your tables have primary keys (required for Postgres logical replication)
- Pipeline failed to start: Check the error message in the status view for specific details
- No data being replicated: Verify your Postgres publication includes the correct tables and event types
For more troubleshooting help, see the Replication FAQ.
Limitations#
Replication has the following limitations:
- Primary keys required: Tables must have primary keys (Postgres logical replication requirement)
- Custom data types: Not supported
- Schema changes: Not automatically handled
- No data transformation: Data is replicated as-is without transformation
- Data duplicates: Duplicates can occur when stopping a pipeline if your database has transactions that take longer than a few minutes to complete. See Can data duplicates occur? for details
Destination-specific limitations, such as BigQuery's row size limits, are documented in Step 3 above.
Future work#
Replication is actively being developed. Planned improvements include:
- DDL support: Automatic handling of Postgres schema changes (ALTER TABLE, ADD COLUMN, etc.)
- Additional destinations: Support for more data warehouses and analytics platforms
There are no public timelines for these features, but they represent the roadmap for making replication more robust and flexible.