Build a User Management App with Swift and SwiftUI
This tutorial demonstrates how to build a basic user management app. The app authenticates and identifies the user, stores their profile information in the database, and allows the user to log in, update their profile details, and upload a profile photo. The app uses:
- Supabase Database - a Postgres database for storing your user data and Row Level Security so data is protected and users can only access their own information.
- Supabase Auth - allow users to sign up and log in.
- Supabase Storage - allow users to upload a profile photo.
If you get stuck while working through this guide, you can find the full example on GitHub.
Project setup#
Before you start building you need to set up the Database and API. You can do this by starting a new Project in Supabase and then creating a "schema" inside the database.
Create a project#
- Create a new project in the Supabase Dashboard.
- Enter your project details.
- Wait for the new database to launch.
Set up the database schema#
Now set up the database schema. You can use the "User Management Starter" quickstart in the SQL Editor, or you can copy/paste the SQL from below and run it.
- Go to the SQL Editor page in the Dashboard.
- Click User Management Starter under the Community > Quickstarts tab.
- Click Run.
You can pull the database schema down to your local project by running the db pull command. Read the local development docs for detailed instructions.
1supabase link --project-ref <project-id>2# You can get <project-id> from your project's dashboard URL: https://supabase.com/dashboard/project/<project-id>3supabase db pullGet API details#
To interact with data in database tables, you use the client libraries that wrap the auto-generated Data API endpoints, authenticating using the Project URL and key from the project Connect dialog.
Project URL
Publishable key
Read the API keys docs for a full explanation of all key types, their uses, and where to find them.
Building the app#
Build the SwiftUI app from scratch.
Create a SwiftUI app in Xcode#
Open Xcode and create a new SwiftUI project.
Add the supabase-swift dependency.
Add the https://github.com/supabase/supabase-swift package to your app. For instructions, see the Apple tutorial on adding package dependencies.
Create a helper file to initialize the Supabase client. You need the API URL and the key that you copied earlier. These variables will be exposed on the application, and that's completely fine since you have Row Level Security enabled on your database.
1import Foundation2import Supabase34let supabase = SupabaseClient(5 supabaseURL: URL(string: "YOUR_SUPABASE_URL")!,6 supabaseKey: "YOUR_SUPABASE_PUBLISHABLE_KEY"7)Set up a login view#
Set up a SwiftUI view to manage logins and sign ups. Users should be able to sign in using a magic link.
1import SwiftUI2import Supabase34struct AuthView: View {5 @State var email = ""6 @State var isLoading = false7 @State var result: Result<Void, Error>?89 var body: some View {10 Form {11 Section {12 TextField("Email", text: $email)13 .textContentType(.emailAddress)14 .textInputAutocapitalization(.never)15 .autocorrectionDisabled()16 }1718 Section {19 Button("Sign in") {20 signInButtonTapped()21 }2223 if isLoading {24 ProgressView()25 }26 }2728 if let result {29 Section {30 switch result {31 case .success:32 Text("Check your inbox.")33 case .failure(let error):34 Text(error.localizedDescription).foregroundStyle(.red)35 }36 }37 }38 }39 .onOpenURL(perform: { url in40 Task {41 do {42 try await supabase.auth.session(from: url)43 } catch {44 self.result = .failure(error)45 }46 }47 })48 }4950 func signInButtonTapped() {51 Task {52 isLoading = true53 defer { isLoading = false }5455 do {56 try await supabase.auth.signInWithOTP(57 email: email,58 redirectTo: URL(string: "io.supabase.user-management://login-callback")59 )60 result = .success(())61 } catch {62 result = .failure(error)63 }64 }65 }66}The example uses a custom redirectTo URL. For this to work, add a custom redirect URL to Supabase and a custom URL scheme to your SwiftUI application. Follow the guide on implementing deep link handling.
Account view#
After a user is signed in, you can allow them to edit their profile details and manage their account.
Create a new view for that called ProfileView.swift.
1import SwiftUI23struct ProfileView: View {4 @State var username = ""5 @State var fullName = ""6 @State var website = ""78 @State var isLoading = false910 var body: some View {11 NavigationStack {12 Form {13 Section {14 TextField("Username", text: $username)15 .textContentType(.username)16 .textInputAutocapitalization(.never)17 TextField("Full name", text: $fullName)18 .textContentType(.name)19 TextField("Website", text: $website)20 .textContentType(.URL)21 .textInputAutocapitalization(.never)22 }2324 Section {25 Button("Update profile") {26 updateProfileButtonTapped()27 }28 .bold()2930 if isLoading {31 ProgressView()32 }33 }34 }35 .navigationTitle("Profile")36 .toolbar(content: {37 ToolbarItem(placement: .topBarLeading){38 Button("Sign out", role: .destructive) {39 Task {40 try? await supabase.auth.signOut()41 }42 }43 }44 })45 }46 .task {47 await getInitialProfile()48 }49 }5051 func getInitialProfile() async {52 do {53 let currentUser = try await supabase.auth.session.user5455 let profile: Profile =56 try await supabase57 .from("profiles")58 .select()59 .eq("id", value: currentUser.id)60 .single()61 .execute()62 .value6364 self.username = profile.username ?? ""65 self.fullName = profile.fullName ?? ""66 self.website = profile.website ?? ""6768 } catch {69 debugPrint(error)70 }71 }7273 func updateProfileButtonTapped() {74 Task {75 isLoading = true76 defer { isLoading = false }77 do {78 let currentUser = try await supabase.auth.session.user7980 try await supabase81 .from("profiles")82 .update(83 UpdateProfileParams(84 username: username,85 fullName: fullName,86 website: website87 )88 )89 .eq("id", value: currentUser.id)90 .execute()91 } catch {92 debugPrint(error)93 }94 }95 }96}Models#
In ProfileView.swift, you used 2 model types for deserializing the response and serializing the request to Supabase. Add those in a new Models.swift file.
1struct Profile: Decodable {2 let username: String?3 let fullName: String?4 let website: String?56 enum CodingKeys: String, CodingKey {7 case username8 case fullName = "full_name"9 case website10 }11}1213struct UpdateProfileParams: Encodable {14 let username: String15 let fullName: String16 let website: String1718 enum CodingKeys: String, CodingKey {19 case username20 case fullName = "full_name"21 case website22 }23}Profile photos#
Next, add a way for users to upload a profile photo. Supabase configures every project with Storage for managing large files like photos and videos.
Add PhotosPicker#
Add support for the user to pick an image from the library and upload it. Start by creating a new type to hold the picked avatar image:
1import SwiftUI23struct AvatarImage: Transferable, Equatable {4 let image: Image5 let data: Data67 static var transferRepresentation: some TransferRepresentation {8 DataRepresentation(importedContentType: .image) { data in9 guard let image = AvatarImage(data: data) else {10 throw TransferError.importFailed11 }1213 return image14 }15 }16}1718extension AvatarImage {19 init?(data: Data) {20 guard let uiImage = UIImage(data: data) else {21 return nil22 }2324 let image = Image(uiImage: uiImage)25 self.init(image: image, data: data)26 }27}2829enum TransferError: Error {30 case importFailed31}Add PhotosPicker to profile page#
1import PhotosUI2import Storage3import Supabase4import SwiftUI56struct ProfileView: View {7 @State var username = ""8 @State var fullName = ""9 @State var website = ""1011 @State var isLoading = false1213 @State var imageSelection: PhotosPickerItem?14 @State var avatarImage: AvatarImage?1516 var body: some View {17 NavigationStack {18 Form {19 Section {20 HStack {21 Group {22 if let avatarImage {23 avatarImage.image.resizable()24 } else {25 Color.clear26 }27 }28 .scaledToFit()29 .frame(width: 80, height: 80)3031 Spacer()3233 PhotosPicker(selection: $imageSelection, matching: .images) {34 Image(systemName: "pencil.circle.fill")35 .symbolRenderingMode(.multicolor)36 .font(.system(size: 30))37 .foregroundColor(.accentColor)38 }39 }40 }4142 Section {43 TextField("Username", text: $username)44 .textContentType(.username)45 .textInputAutocapitalization(.never)46 TextField("Full name", text: $fullName)47 .textContentType(.name)48 TextField("Website", text: $website)49 .textContentType(.URL)50 .textInputAutocapitalization(.never)51 }5253 Section {54 Button("Update profile") {55 updateProfileButtonTapped()56 }57 .bold()5859 if isLoading {60 ProgressView()61 }62 }63 }64 .navigationTitle("Profile")65 .toolbar(content: {66 ToolbarItem {67 Button("Sign out", role: .destructive) {68 Task {69 try? await supabase.auth.signOut()70 }71 }72 }73 })74 .onChange(of: imageSelection) { _, newValue in75 guard let newValue else { return }76 loadTransferable(from: newValue)77 }78 }79 .task {80 await getInitialProfile()81 }82 }8384 func getInitialProfile() async {85 do {86 let currentUser = try await supabase.auth.session.user8788 let profile: Profile =89 try await supabase90 .from("profiles")91 .select()92 .eq("id", value: currentUser.id)93 .single()94 .execute()95 .value9697 username = profile.username ?? ""98 fullName = profile.fullName ?? ""99 website = profile.website ?? ""100101 if let avatarURL = profile.avatarURL, !avatarURL.isEmpty {102 try await downloadImage(path: avatarURL)103 }104105 } catch {106 debugPrint(error)107 }108 }109110 func updateProfileButtonTapped() {111 Task {112 isLoading = true113 defer { isLoading = false }114 do {115 let imageURL = try await uploadImage()116117 let currentUser = try await supabase.auth.session.user118119 let updatedProfile = Profile(120 username: username,121 fullName: fullName,122 website: website,123 avatarURL: imageURL124 )125126 try await supabase127 .from("profiles")128 .update(updatedProfile)129 .eq("id", value: currentUser.id)130 .execute()131 } catch {132 debugPrint(error)133 }134 }135 }136137 private func loadTransferable(from imageSelection: PhotosPickerItem) {138 Task {139 do {140 avatarImage = try await imageSelection.loadTransferable(type: AvatarImage.self)141 } catch {142 debugPrint(error)143 }144 }145 }146147 private func downloadImage(path: String) async throws {148 let data = try await supabase.storage.from("avatars").download(path: path)149 avatarImage = AvatarImage(data: data)150 }151152 private func uploadImage() async throws -> String? {153 guard let data = avatarImage?.data else { return nil }154155 let filePath = "\(UUID().uuidString).jpeg"156157 try await supabase.storage158 .from("avatars")159 .upload(160 filePath,161 data: data,162 options: FileOptions(contentType: "image/jpeg")163 )164165 return filePath166 }167}Finally, update your Models.
1struct Profile: Codable {2 let username: String?3 let fullName: String?4 let website: String?5 let avatarURL: String?67 enum CodingKeys: String, CodingKey {8 case username9 case fullName = "full_name"10 case website11 case avatarURL = "avatar_url"12 }13}You no longer need the UpdateProfileParams struct, as you can now reuse the Profile struct for both request and response calls.
Launch!#
With all the views in place, add an entry point for the application.
Add a new AppView.swift file.
1import SwiftUI23struct AppView: View {4 @State var isAuthenticated = false56 var body: some View {7 Group {8 if isAuthenticated {9 ProfileView()10 } else {11 AuthView()12 }13 }14 .task {15 for await state in supabase.auth.authStateChanges {16 if [.initialSession, .signedIn, .signedOut].contains(state.event) {17 isAuthenticated = state.session != nil18 }19 }20 }21 }22}Update the entry point to the newly created AppView. Run in Xcode to launch your application in the simulator.
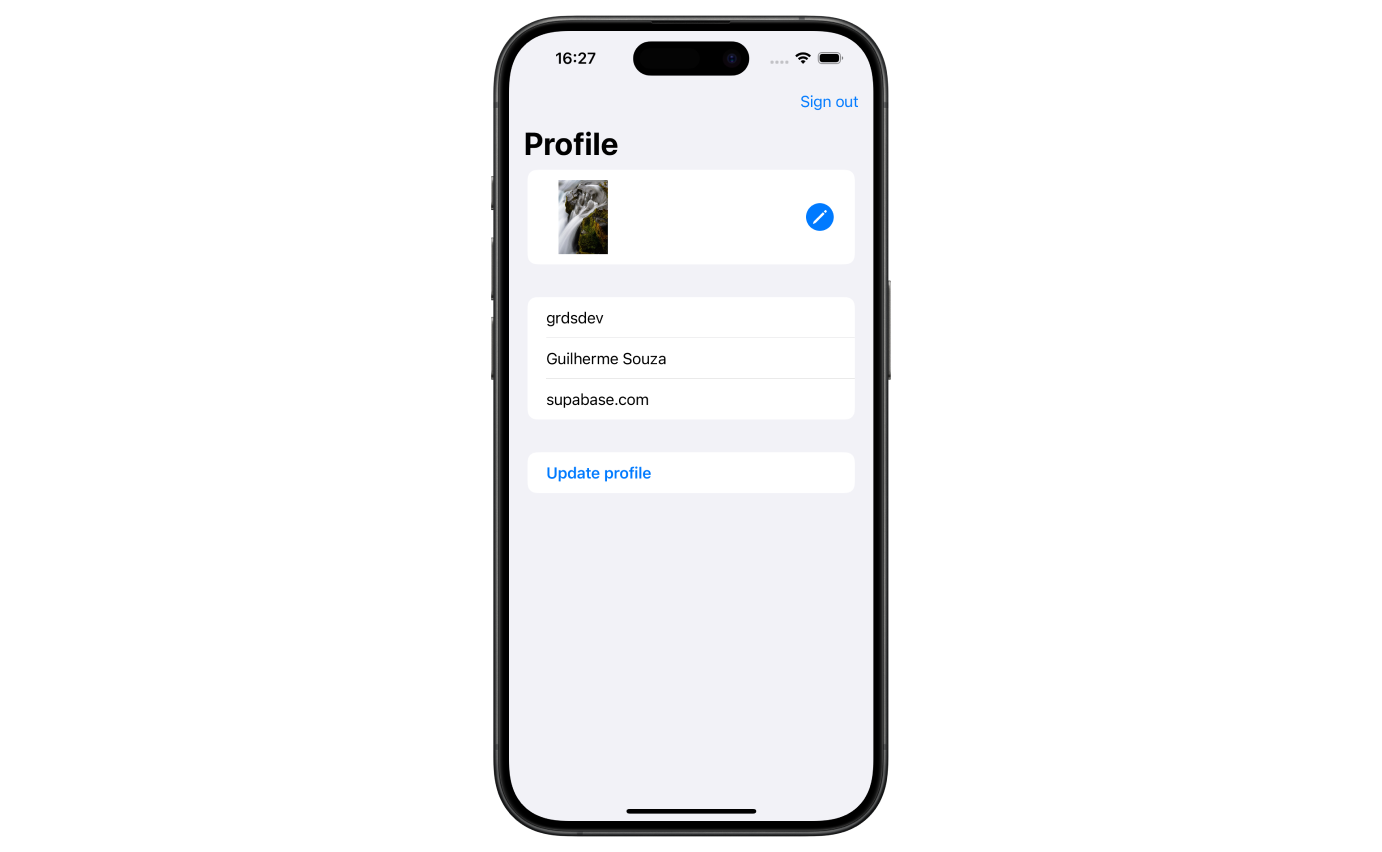
At this stage you have a fully functional application!