Build a User Management App with Ionic React
This tutorial demonstrates how to build a basic user management app. The app authenticates and identifies the user, stores their profile information in the database, and allows the user to log in, update their profile details, and upload a profile photo. The app uses:
- Supabase Database - a Postgres database for storing your user data and Row Level Security so data is protected and users can only access their own information.
- Supabase Auth - allow users to sign up and log in.
- Supabase Storage - allow users to upload a profile photo.
If you get stuck while working through this guide, refer to the full example on GitHub.
Project setup#
Before you start building you need to set up the Database and API. You can do this by starting a new Project in Supabase and then creating a "schema" inside the database.
Create a project#
- Create a new project in the Supabase Dashboard.
- Enter your project details.
- Wait for the new database to launch.
Set up the database schema#
Now set up the database schema. You can use the "User Management Starter" quickstart in the SQL Editor, or you can copy/paste the SQL from below and run it.
- Go to the SQL Editor page in the Dashboard.
- Click User Management Starter under the Community > Quickstarts tab.
- Click Run.
You can pull the database schema down to your local project by running the db pull command. Read the local development docs for detailed instructions.
1supabase link --project-ref <project-id>2# You can get <project-id> from your project's dashboard URL: https://supabase.com/dashboard/project/<project-id>3supabase db pullGet API details#
To interact with data in database tables, you use the client libraries that wrap the auto-generated Data API endpoints, authenticating using the Project URL and key from the project Connect dialog.
Project URL
Publishable key
Read the API keys docs for a full explanation of all key types, their uses, and where to find them.
Building the app#
Start building the React app from scratch.
Initialize an Ionic React app#
Use the Ionic CLI to initialize
an app called supabase-ionic-react:
1npm install -g @ionic/cli2ionic start supabase-ionic-react blank --type react3cd supabase-ionic-reactInstall the only additional dependency: supabase-js
1npm install @supabase/supabase-jsSave the environment variables in a .env. You need the API URL and the key that you copied earlier.
1VITE_SUPABASE_URL=YOUR_SUPABASE_URL2VITE_SUPABASE_KEY=YOUR_SUPABASE_KEYWith the API credentials in place, create a helper file to initialize the Supabase client. These variables will be exposed
in the browser, which is safe because they use a restricted publishable key and the SQL quickstart enables Row Level Security on the profiles table.
src/supabaseClient.ts
1import { createClient } from '@supabase/supabase-js'23const supabaseUrl = import.meta.env.VITE_SUPABASE_URL4const supabasePublishableKey = import.meta.env.VITE_SUPABASE_PUBLISHABLE_KEY56if (!supabaseUrl || !supabasePublishableKey) {7 throw new Error(8 'Missing Supabase environment variables: VITE_SUPABASE_URL and VITE_SUPABASE_PUBLISHABLE_KEY must be set.'9 )10}1112export const supabase = createClient(supabaseUrl, supabasePublishableKey)Set up a login route#
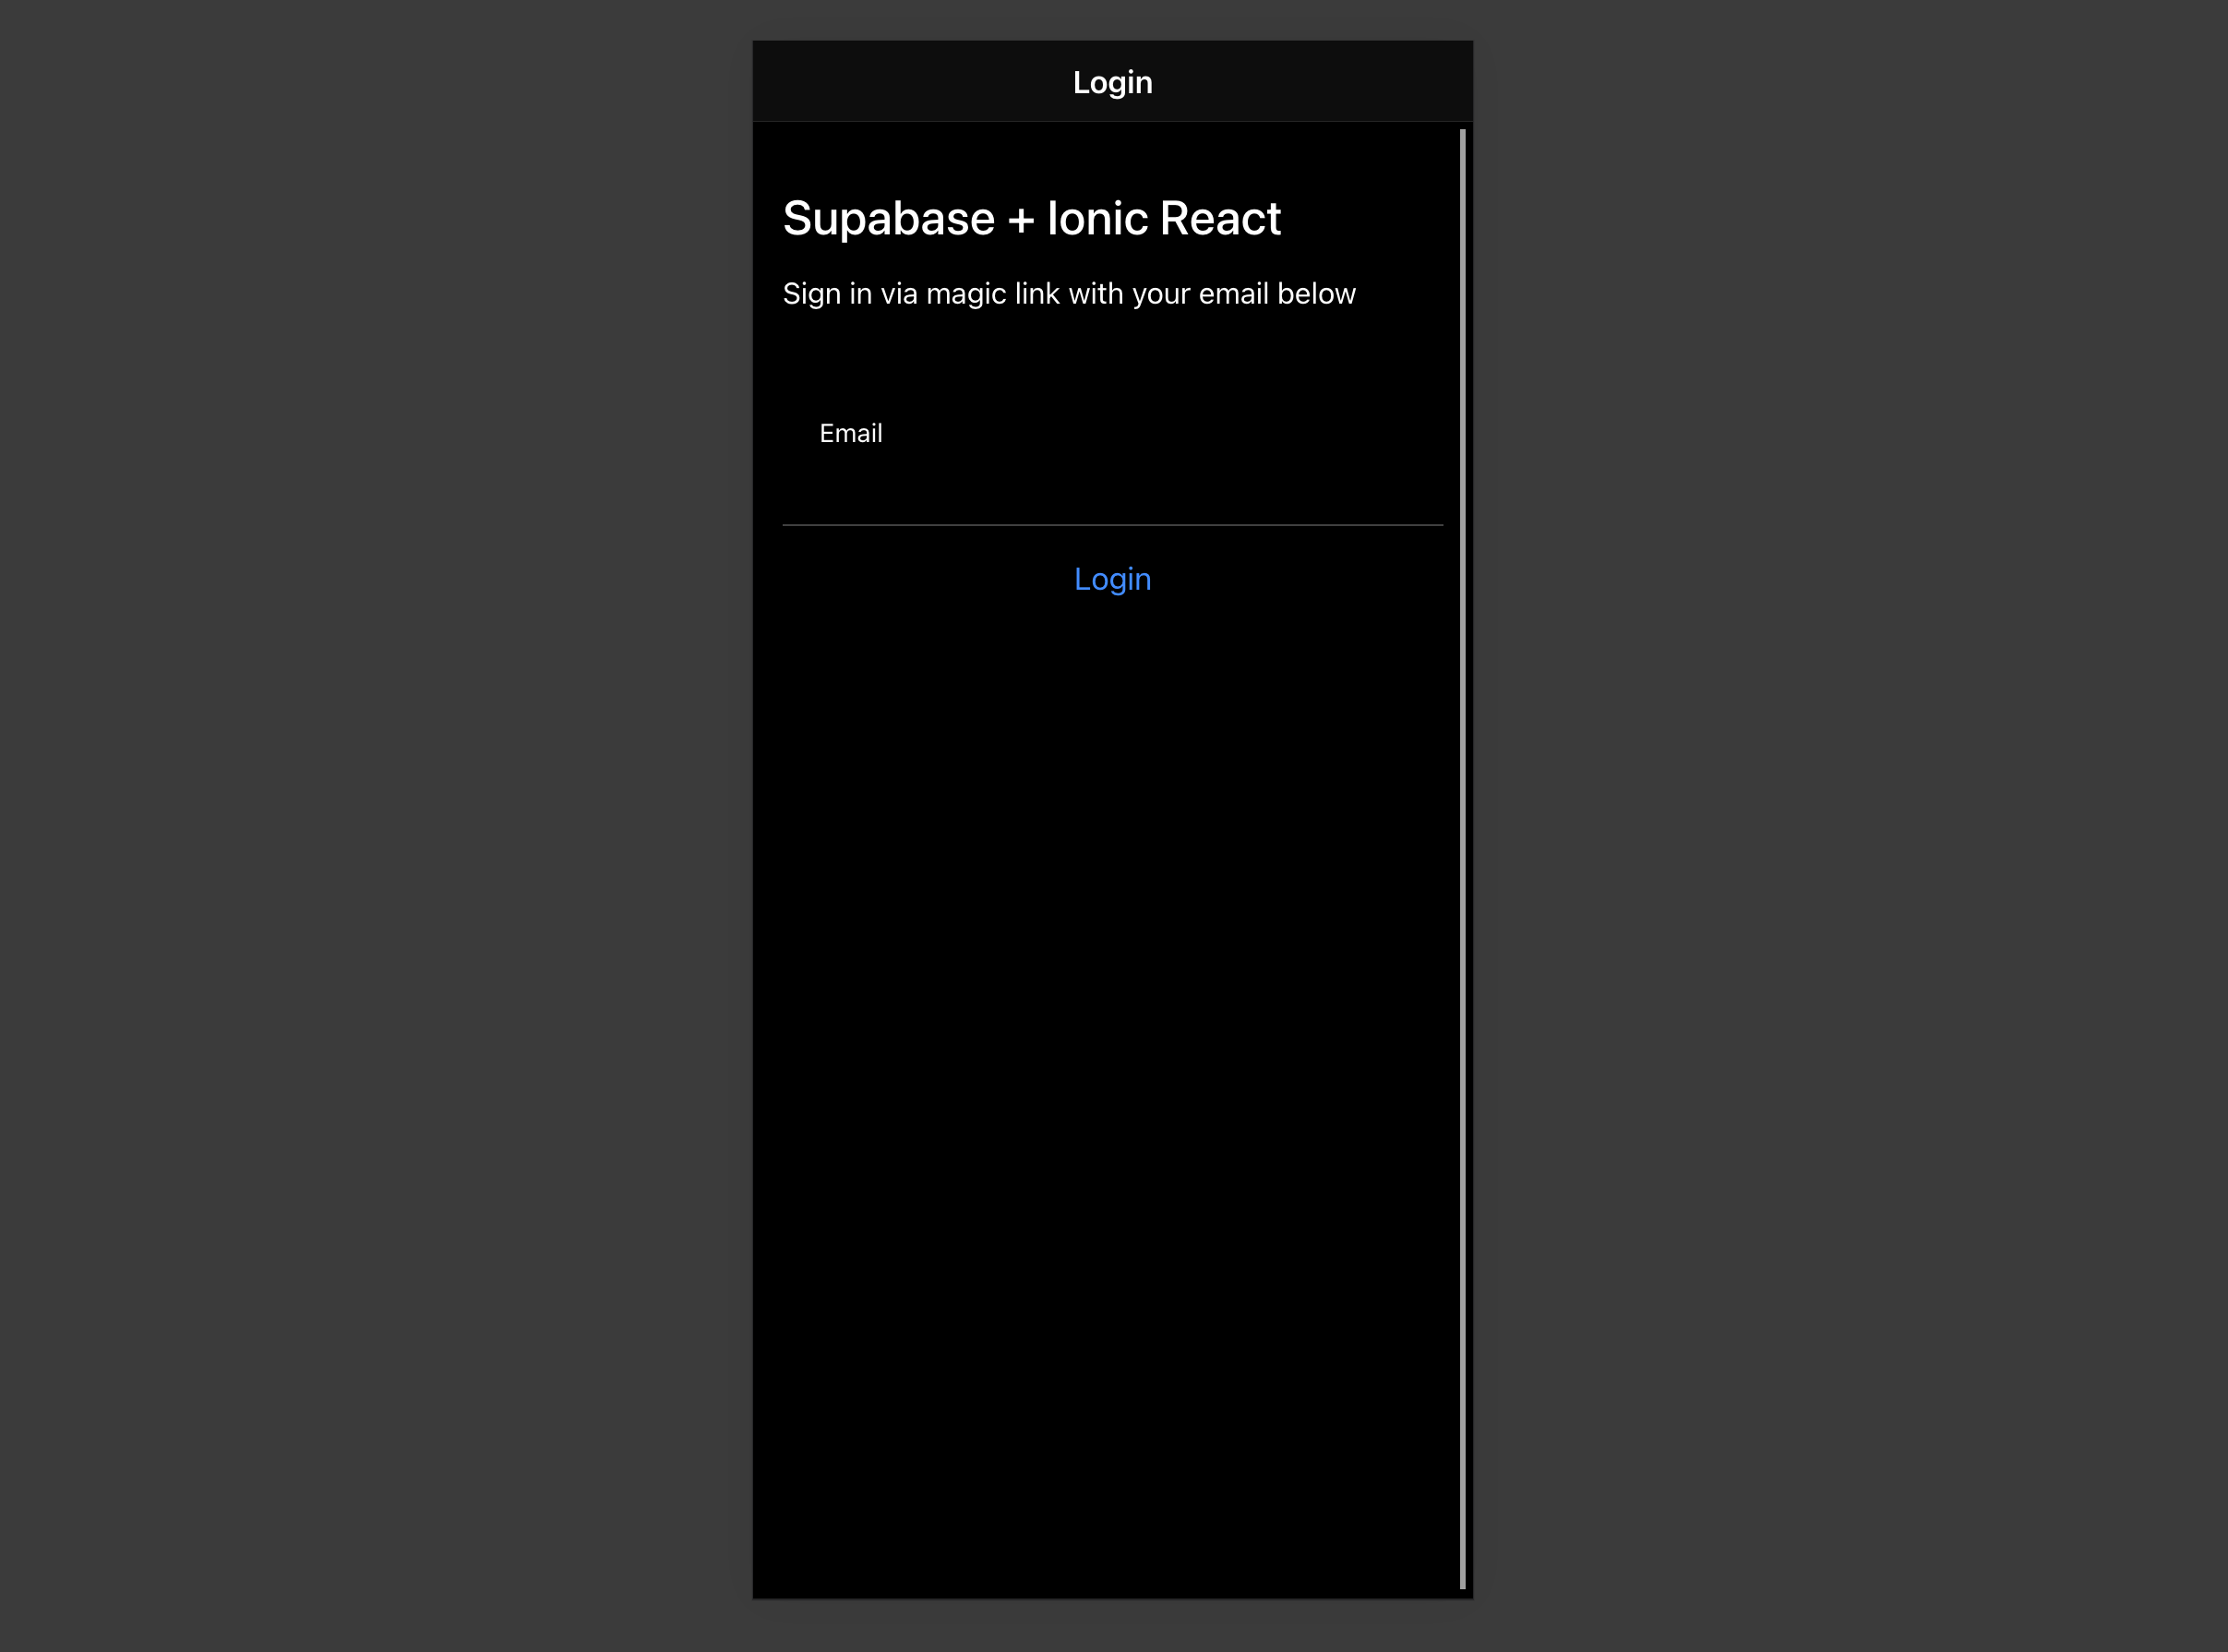
Set up a React component to manage logins and sign ups which uses Magic Links, so users can sign in with their email without using passwords.
src/pages/Login.tsx
1import { useState } from 'react'2import type React from 'react'3import {4 IonButton,5 IonContent,6 IonHeader,7 IonInput,8 IonItem,9 IonList,10 IonPage,11 IonTitle,12 IonToolbar,13 useIonToast,14 useIonLoading,15} from '@ionic/react'16import { supabase } from '../supabaseClient'1718export function LoginPage() {19 const [email, setEmail] = useState('')2021 const [showLoading, hideLoading] = useIonLoading()22 const [showToast] = useIonToast()23 const handleLogin = async (e: React.FormEvent<HTMLFormElement>) => {24 e.preventDefault()25 await showLoading()26 try {27 const { error } = await supabase.auth.signInWithOtp({ email })28 if (error) throw error29 await showToast({ message: 'Check your email for the login link!' })30 } catch (e: any) {31 await showToast({ message: e.error_description || e.message, duration: 5000 })32 } finally {33 await hideLoading()34 }35 }36 return (37 <IonPage>38 <IonHeader>39 <IonToolbar>40 <IonTitle>Login</IonTitle>41 </IonToolbar>42 </IonHeader>4344 <IonContent>45 <div className="ion-padding">46 <h1>Supabase + Ionic React</h1>47 <p>Sign in via magic link with your email below</p>48 </div>49 <IonList inset={true}>50 <form onSubmit={handleLogin}>51 <IonItem>52 <IonInput53 value={email}54 name="email"55 onIonInput={(e) => setEmail(e.detail.value ?? '')}56 type="email"57 label="Email"58 labelPlacement="stacked"59 ></IonInput>60 </IonItem>61 <div className="ion-text-center">62 <IonButton type="submit" fill="clear">63 Login64 </IonButton>65 </div>66 </form>67 </IonList>68 </IonContent>69 </IonPage>70 )71}Account page#
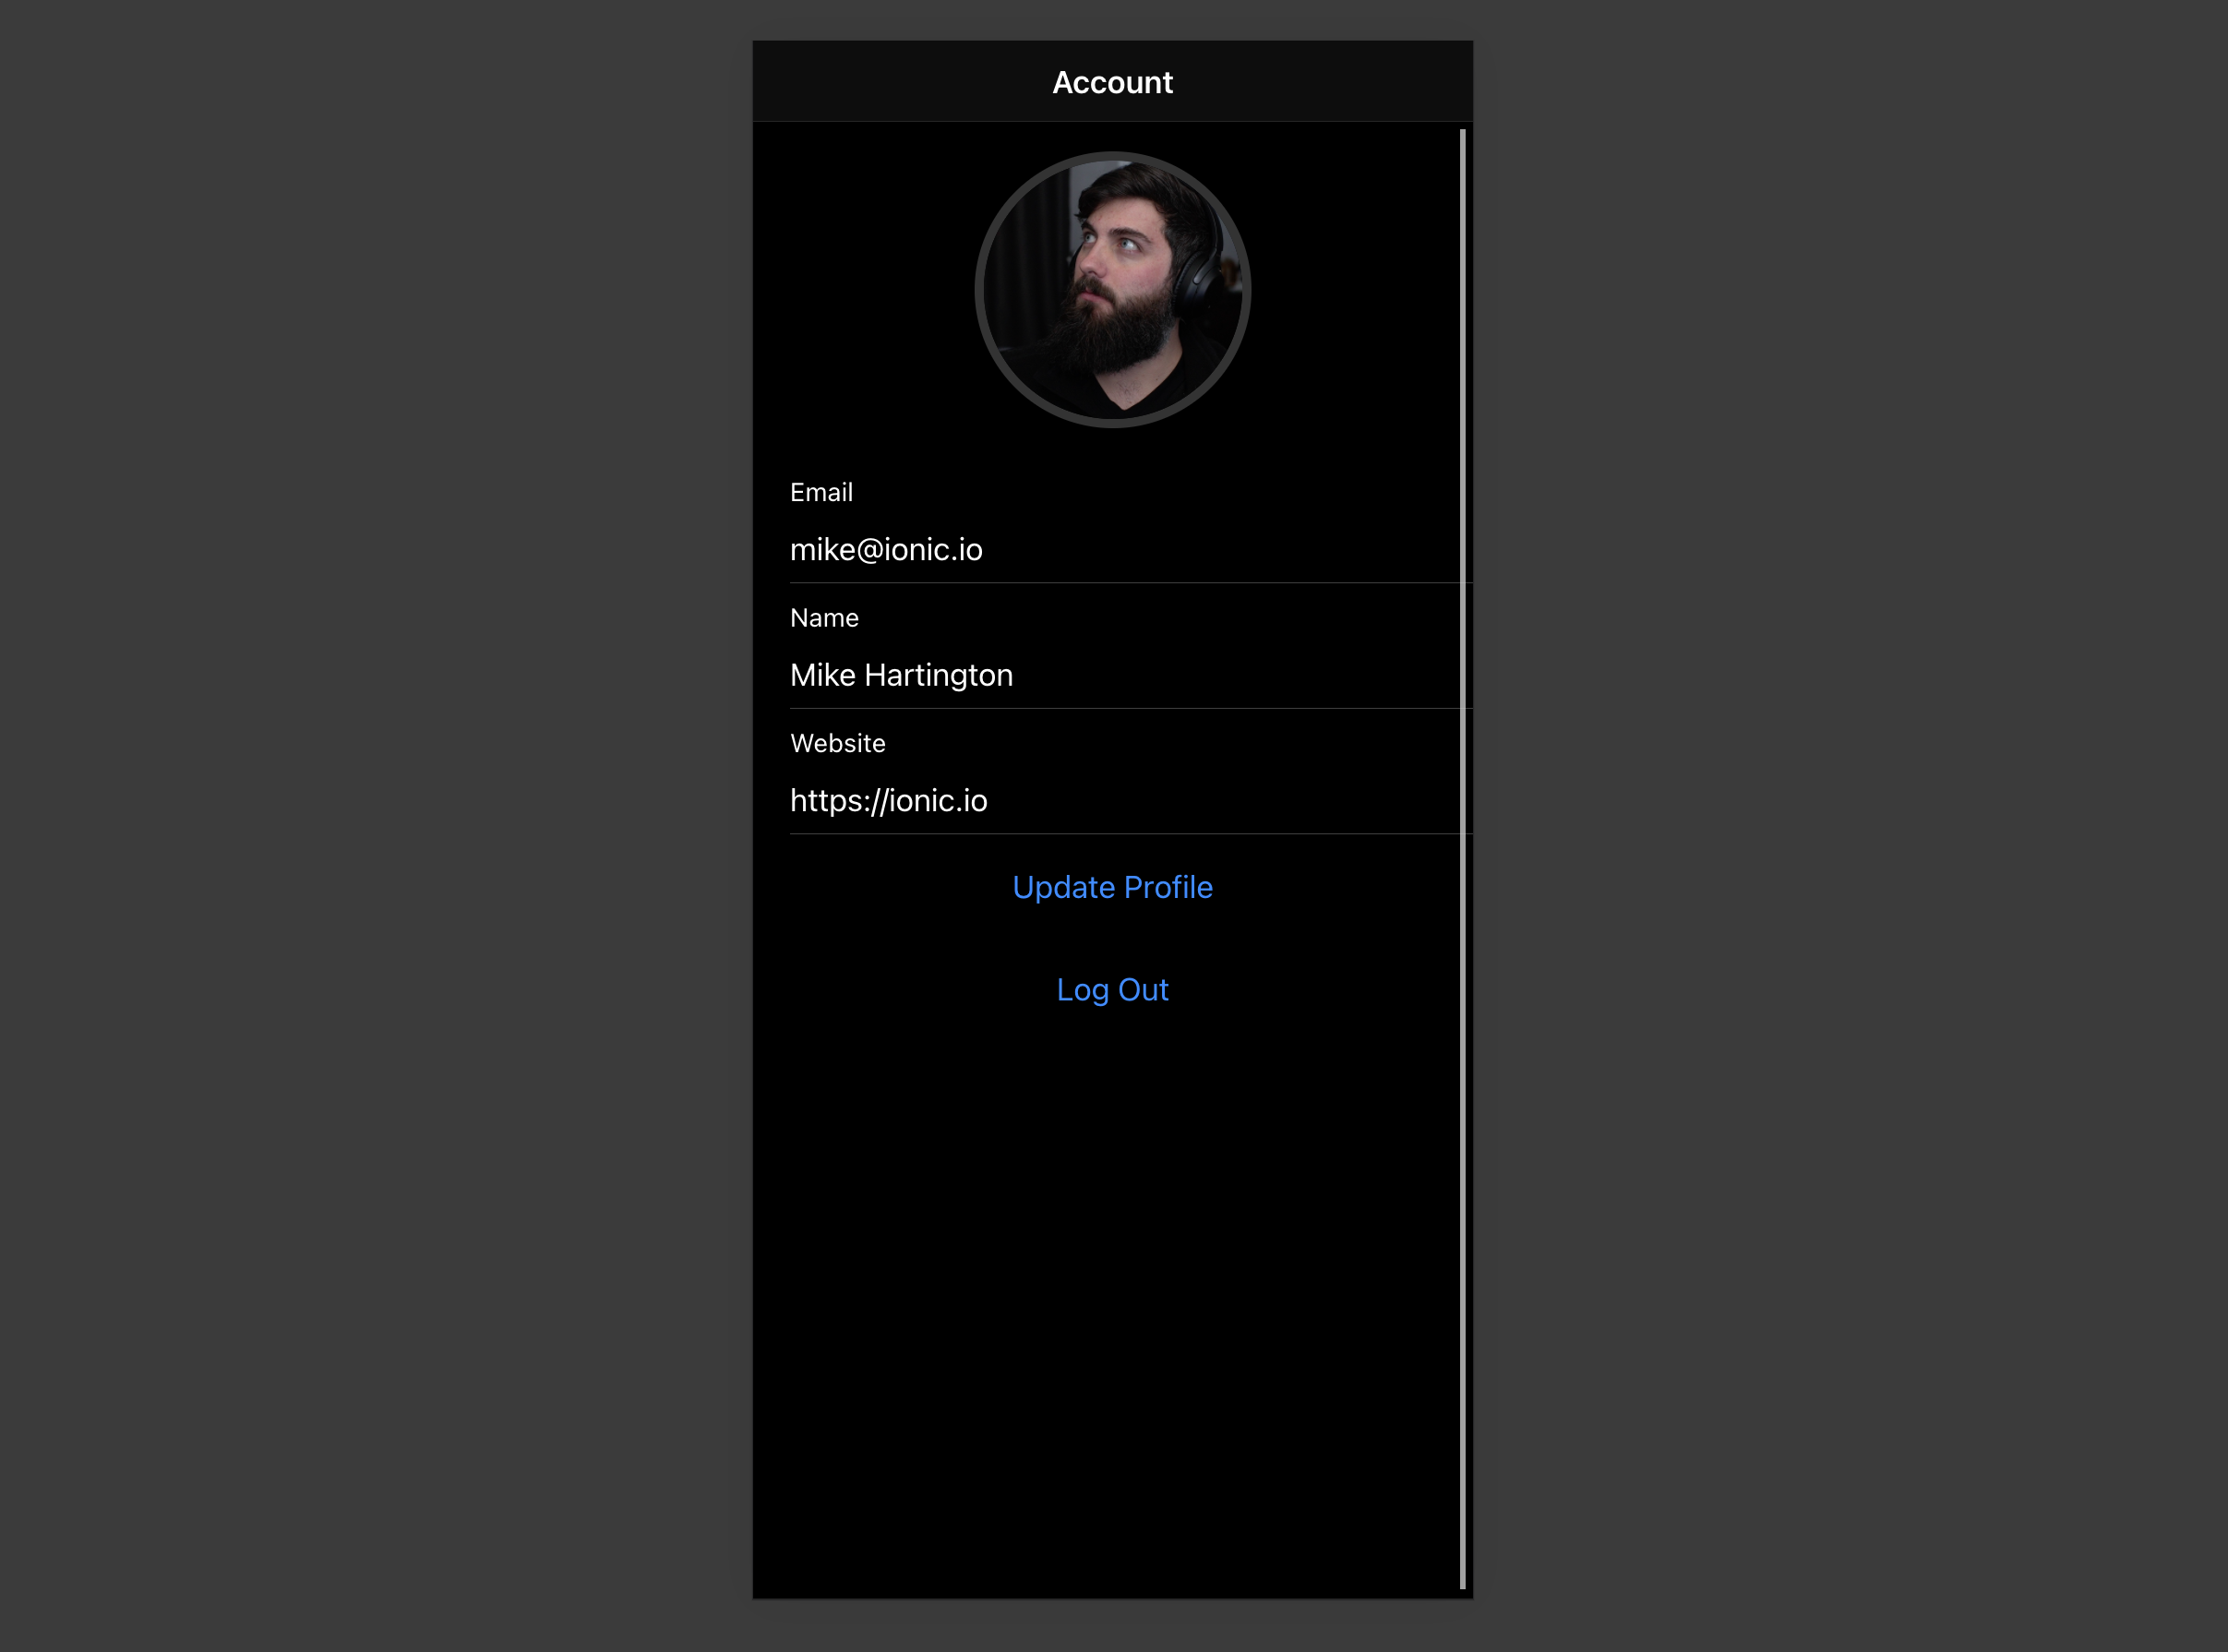
After a user signs in, they should be able to edit their profile details and manage their account.
Create a new component for that called Account.tsx.
src/pages/Account.tsx
1import {2 IonButton,3 IonContent,4 IonHeader,5 IonInput,6 IonItem,7 IonLabel,8 IonPage,9 IonTitle,10 IonToolbar,11 useIonLoading,12 useIonToast,13 useIonRouter,14} from '@ionic/react'15import { useEffect, useState } from 'react'1617// ...1819import { supabase } from '../supabaseClient'2021export function AccountPage() {22 const [showLoading, hideLoading] = useIonLoading()23 const [showToast] = useIonToast()24 const router = useIonRouter()25 const [email, setEmail] = useState('')26 const [profile, setProfile] = useState({27 username: '',28 website: '',29 avatar_url: '',30 })3132 useEffect(() => {33 getProfile()34 }, [])3536 const getProfile = async () => {37 await showLoading()38 try {39 const { data: authData } = await supabase.auth.getClaims()40 if (!authData?.claims) throw new Error('No user logged in')41 const { claims } = authData4243 setEmail(claims.email as string)4445 const { data, error, status } = await supabase46 .from('profiles')47 .select(`username, website, avatar_url`)48 .eq('id', claims.sub)49 .single()5051 if (error && status !== 406) {52 throw error53 }5455 if (data) {56 setProfile({57 username: data.username,58 website: data.website,59 avatar_url: data.avatar_url,60 })61 }62 } catch (error: any) {63 showToast({ message: error.message, duration: 5000 })64 } finally {65 await hideLoading()66 }67 }6869 const signOut = async () => {70 await supabase.auth.signOut()71 router.push('/', 'forward', 'replace')72 }7374 const updateProfile = async (e?: any, avatar_url?: string) => {75 e?.preventDefault()7677 await showLoading()7879 try {80 const { data } = await supabase.auth.getClaims()81 if (!data?.claims) throw new Error('No user logged in')82 const { claims } = data8384 const updates = {85 id: claims.sub,86 ...profile,87 ...(avatar_url !== undefined ? { avatar_url } : {}),88 updated_at: new Date(),89 }9091 const { error } = await supabase.from('profiles').upsert(updates)9293 if (error) {94 throw error95 }9697 // Ensure local profile state reflects the updated avatar URL98 if (avatar_url !== undefined) {99 setProfile((prev) => ({100 ...prev,101 avatar_url,102 }))103 }104105 if (avatar_url !== undefined) {106 setProfile((current) => ({107 ...current,108 avatar_url,109 }))110 }111 } catch (error: any) {112 showToast({ message: error.message, duration: 5000 })113 } finally {114 await hideLoading()115 }116 }117118 return (119 <IonPage>120 <IonHeader>121 <IonToolbar>122 <IonTitle>Account</IonTitle>123 </IonToolbar>124 </IonHeader>125126 <IonContent>127128 {/* ... */}129130 <form onSubmit={updateProfile}>131 <IonItem>132 <IonLabel>133 <p>Email</p>134 <p>{email}</p>135 </IonLabel>136 </IonItem>137138 <IonItem>139 <IonInput140 type="text"141 name="username"142 value={profile.username}143 onIonInput={(e) => setProfile({ ...profile, username: e.detail.value ?? '' })}144 label="Name"145 labelPlacement="stacked"146 ></IonInput>147 </IonItem>148149 <IonItem>150 <IonInput151 type="url"152 name="website"153 value={profile.website}154 onIonInput={(e) => setProfile({ ...profile, website: e.detail.value ?? '' })}155 label="Website"156 labelPlacement="stacked"157 ></IonInput>158 </IonItem>159 <div className="ion-text-center">160 <IonButton fill="clear" type="submit">161 Update Profile162 </IonButton>163 </div>164 </form>165166 <div className="ion-text-center">167 <IonButton fill="clear" onClick={signOut}>168 Log Out169 </IonButton>170 </div>171 </IonContent>172 </IonPage>173 )174}Launch!#
Now that you have all the components in place, update App.tsx:
src/App.tsx
1import { Redirect, Route } from 'react-router-dom'2import { IonApp, IonRouterOutlet, setupIonicReact } from '@ionic/react'3import { IonReactRouter } from '@ionic/react-router'4import { supabase } from './supabaseClient'56import '@ionic/react/css/ionic.bundle.css'78/* Theme variables */9import './theme/variables.css'10import { LoginPage } from './pages/Login'11import { AccountPage } from './pages/Account'12import { useEffect, useState } from 'react'13import type { FC } from 'react'1415setupIonicReact()1617const App: FC = () => {18 const [claims, setClaims] = useState<any>(null)1920 useEffect(() => {21 supabase.auth.getClaims().then(({ data }) => {22 if (data) {23 setClaims(data.claims)24 }25 })2627 const {28 data: { subscription },29 } = supabase.auth.onAuthStateChange(() => {30 supabase.auth.getClaims().then(({ data }) => {31 if (data) {32 setClaims(data.claims)33 }34 })35 })3637 return () => subscription.unsubscribe()38 }, [])3940 return (41 <IonApp>42 <IonReactRouter>43 <IonRouterOutlet>44 <Route45 exact46 path="/"47 render={() => {48 return claims ? <Redirect to="/account" /> : <LoginPage />49 }}50 />51 <Route52 exact53 path="/account"54 render={() => (claims ? <AccountPage /> : <Redirect to="/" />)}55 />56 </IonRouterOutlet>57 </IonReactRouter>58 </IonApp>59 )60}6162export default AppOnce that's done, run this in a terminal window:
1ionic serveThen open your browser to the URL printed by ionic serve (by default, http://localhost:8100) and you should see the completed app.
Bonus: Profile photos#
Every Supabase project is configured with Storage for managing large files like photos and videos.
Create an upload widget#
First install two packages in order to interact with the user's camera.
1npm install @ionic/pwa-elements @capacitor/cameraCapacitor is a cross platform native runtime from Ionic that enables web apps to be deployed through the app store and provides access to native device API.
Ionic PWA elements is a companion package that will polyfill certain browser APIs that provide no user interface with custom Ionic UI.
With those packages installed update index.tsx to include an additional bootstrapping call for the Ionic PWA Elements.
src/index.tsx
1import React from 'react'2import { createRoot } from 'react-dom/client'3import App from './App'4import { defineCustomElements } from '@ionic/pwa-elements/loader'56defineCustomElements(window)78const container = document.getElementById('root')9const root = createRoot(container!)10root.render(11 <React.StrictMode>12 <App />13 </React.StrictMode>14)Then create an AvatarComponent.
src/components/Avatar.tsx
1import { IonIcon } from '@ionic/react'2import { person } from 'ionicons/icons'3import { Camera, CameraResultType } from '@capacitor/camera'4import { useEffect, useState } from 'react'5import { supabase } from '../supabaseClient'6import './Avatar.css'78export function Avatar({9 url,10 onUpload,11}: {12 url: string13 onUpload: (file: string) => Promise<void>14}) {15 const [avatarUrl, setAvatarUrl] = useState<string | undefined>()1617 useEffect(() => {18 if (url) {19 downloadImage(url)20 }21 }, [url])2223 const uploadAvatar = async () => {24 try {25 const photo = await Camera.getPhoto({26 resultType: CameraResultType.DataUrl,27 })2829 const file = await fetch(photo.dataUrl!)30 .then((res) => res.blob())31 .then((blob) => new File([blob], 'my-file', { type: `image/${photo.format}` }))3233 const fileName = `${Math.random()}-${new Date().getTime()}.${photo.format}`34 const { error: uploadError } = await supabase.storage.from('avatars').upload(fileName, file)35 if (uploadError) {36 throw uploadError37 }38 await onUpload(fileName)39 } catch (error) {40 console.log(error)41 }42 }4344 const downloadImage = async (path: string) => {45 try {46 const { data, error } = await supabase.storage.from('avatars').download(path)47 if (error) {48 throw error49 }50 const url = URL.createObjectURL(data)51 setAvatarUrl(url)52 } catch (error: any) {53 console.log('Error downloading image: ', error.message)54 }55 }5657 useEffect(() => {58 return () => {59 if (avatarUrl) {60 URL.revokeObjectURL(avatarUrl)61 }62 }63 }, [avatarUrl])6465 return (66 <div className="avatar">67 <button type="button" className="avatar_wrapper" onClick={uploadAvatar}>68 {avatarUrl ? (69 <img src={avatarUrl} alt="User avatar" />70 ) : (71 <IonIcon icon={person} className="no-avatar" />72 )}73 </button>74 </div>75 )76}Add the new widget#
And then add the widget to the Account page:
src/pages/Account.tsx
1import {2 IonButton,3 IonContent,4 IonHeader,5 IonInput,6 IonItem,7 IonLabel,8 IonPage,9 IonTitle,10 IonToolbar,11 useIonLoading,12 useIonToast,13 useIonRouter,14} from '@ionic/react'15import { useEffect, useState } from 'react'16import { Avatar } from '../components/Avatar'17import { supabase } from '../supabaseClient'1819export function AccountPage() {20 const [showLoading, hideLoading] = useIonLoading()21 const [showToast] = useIonToast()22 const router = useIonRouter()23 const [email, setEmail] = useState('')24 const [profile, setProfile] = useState({25 username: '',26 website: '',27 avatar_url: '',28 })2930 useEffect(() => {31 getProfile()32 }, [])3334 const getProfile = async () => {35 await showLoading()36 try {37 const { data: authData } = await supabase.auth.getClaims()38 if (!authData?.claims) throw new Error('No user logged in')39 const { claims } = authData4041 setEmail(claims.email as string)4243 const { data, error, status } = await supabase44 .from('profiles')45 .select(`username, website, avatar_url`)46 .eq('id', claims.sub)47 .single()4849 if (error && status !== 406) {50 throw error51 }5253 if (data) {54 setProfile({55 username: data.username,56 website: data.website,57 avatar_url: data.avatar_url,58 })59 }60 } catch (error: any) {61 showToast({ message: error.message, duration: 5000 })62 } finally {63 await hideLoading()64 }65 }6667 const signOut = async () => {68 await supabase.auth.signOut()69 router.push('/', 'forward', 'replace')70 }7172 const updateProfile = async (e?: any, avatar_url?: string) => {73 e?.preventDefault()7475 await showLoading()7677 try {78 const { data } = await supabase.auth.getClaims()79 if (!data?.claims) throw new Error('No user logged in')80 const { claims } = data8182 const updates = {83 id: claims.sub,84 ...profile,85 ...(avatar_url !== undefined ? { avatar_url } : {}),86 updated_at: new Date(),87 }8889 const { error } = await supabase.from('profiles').upsert(updates)9091 if (error) {92 throw error93 }9495 // Ensure local profile state reflects the updated avatar URL96 if (avatar_url !== undefined) {97 setProfile((prev) => ({98 ...prev,99 avatar_url,100 }))101 }102103 if (avatar_url !== undefined) {104 setProfile((current) => ({105 ...current,106 avatar_url,107 }))108 }109 } catch (error: any) {110 showToast({ message: error.message, duration: 5000 })111 } finally {112 await hideLoading()113 }114 }115116 return (117 <IonPage>118 <IonHeader>119 <IonToolbar>120 <IonTitle>Account</IonTitle>121 </IonToolbar>122 </IonHeader>123124 <IonContent>125 <Avatar126 url={profile.avatar_url}127 onUpload={(fileName) => updateProfile(undefined, fileName)}128 ></Avatar>129 <form onSubmit={updateProfile}>130 <IonItem>131 <IonLabel>132 <p>Email</p>133 <p>{email}</p>134 </IonLabel>135 </IonItem>136137 <IonItem>138 <IonInput139 type="text"140 name="username"141 value={profile.username}142 onIonInput={(e) => setProfile({ ...profile, username: e.detail.value ?? '' })}143 label="Name"144 labelPlacement="stacked"145 ></IonInput>146 </IonItem>147148 <IonItem>149 <IonInput150 type="url"151 name="website"152 value={profile.website}153 onIonInput={(e) => setProfile({ ...profile, website: e.detail.value ?? '' })}154 label="Website"155 labelPlacement="stacked"156 ></IonInput>157 </IonItem>158 <div className="ion-text-center">159 <IonButton fill="clear" type="submit">160 Update Profile161 </IonButton>162 </div>163 </form>164165 <div className="ion-text-center">166 <IonButton fill="clear" onClick={signOut}>167 Log Out168 </IonButton>169 </div>170 </IonContent>171 </IonPage>172 )173}At this stage you have a fully functional application!